Updates from October, 2008 Toggle Comment Threads | Keyboard Shortcuts

  • pit 11:59 am on October 31, 2008 Permalink | Reply
    Tags: alfa mito, , , mms composer   

    MitoClip Mobile: new Java ME client to compose mobile clips. 

    I’m finally back from flu (what a week!), just in time for a newly released Java ME app!

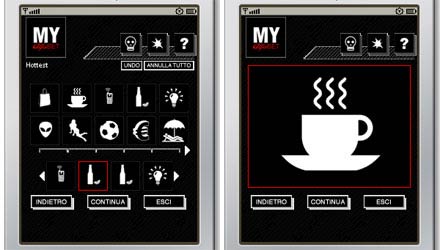
    Named “MitoClip Mobile”, it’s the mobile version of the tool provided on http://www.alfamitoclip.com: it allows users to create short clips by combining icons of multiple categories, and then to send their creations to friends via MMS.

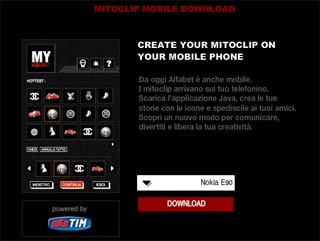
    Want to try it out? Just follow the download link on alfamitoclip.com:

    Select your device:

    And you’re ready to compose!

     
  • pit 12:23 pm on October 13, 2008 Permalink | Reply
    Tags: , , image library, imagefx, , ,   

    ImageFx: first commercial application is out! 

    ImageFx is a Java ME library that allows you to easily add animated transitions between different Images.

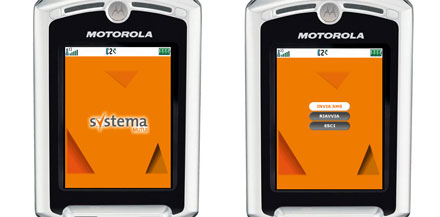
    And today Systema Mutui, the first commercial applications that makes use of it, has finally been launched :)

    The application itself is a simple animation that promotes bank services and allows users to share the animation itself with a friend. Obviously, ImageFx transitions were used to make the whole animation nicer :)

    To get further details about ImageFx API features, you can access its full JavaDocs here: ImageFx JavaDocs. For any other infos, feel free to contact me!

     
  • pit 3:01 pm on October 10, 2008 Permalink | Reply
    Tags: free tools, , sis, swf, swfpack, web 2.0   

    SWFPack: mobile development goes 2.0! 

    Yesterday was a big day for mobile development!

    Kuneri team released SWFPack, an online, free packaging tool for Flash Lite developers!

    SWFPack is available as a beta service for Flash Lite developers without a cost. With the first release, Flash Lite content can be deployed to Symbian devices in SIS format, followed by Series 40 devices in NFL and Windows Mobile devices in CAB formats in the following releases. Kuneri aims to make SWFPack a standard tool, providing more enhanced features in the future

    I’m a big fan of free “2.0″ tools (did you know about StripeGenerator? :) ), and this one absolutely rocks, finally bringing a lot of fresh air to the world of mobile dev.

    With SWFPack you can easily, and without installing anything on your local machine, package and deploy your FlashLite applications. To see how much it is damn easy, just check out the quick SWFPack tour.

    This is an enormous step forward for mobile development: up to now all mobile tools were highly OS-dependent, with the result that non-Windows users could rarely find useful development tools.

    Still reading? Go and try it! :)

     
  • pit 3:02 pm on October 8, 2008 Permalink | Reply
    Tags: , , , ringtones, , ,   

    Create your first Flash Lite ringtone with KuneriLite 

    For those of you who missed it (really??) latest KuneriLite versions have added support for Flash Lite ringtones, one of the coolest FlashLite features around!!

    Today, we’ll see how it is simple to create a FlashLite ringtone with caller-id support and an application that allows users to easily set and unset it.

    Step 1: The FlashLite ringtone

    To start, we’ll build a really simple FlashLite ringtone.

    Let’s start building a simple interface, with these elements:
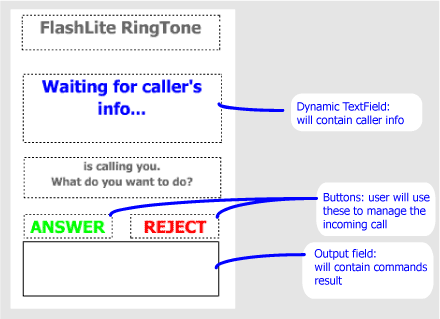
    Now it’s time to add some ActionScript to our interface. So, let’s open frame 1 of our Actions layer.

    Important note: when using KuneriLite from a ringtone SWF, you MUST use port 2001.

    First, we’ll define a method to retrieve caller infos, and display it, depending on the returned data:

    var loader:LoadVars = new LoadVars();
     
    getCallerName();
     
    function getCallerName()
    {
    	commandOutput.text = "Getting caller's info... ";
     
    	loader.onLoad = callerNameHandler;
     
    	loader.load("http://127.0.0.1:2001/Basic/ring?klCommand=callerid");
    }
    function callerNameHandler()
    {
    	commandOutput.text += this.toString();
     
    	if(this.klError != 0)
    	{
    		callerName.text = "Command error: " + this.klError;
    	}
    	else if(this.klName != undefined)
    	{
    		callerName.text = this.klName;
    	}
    	else
    	{
    		callerName.text = this.klNumber;
    	}
    }

    And then, let’s add the call answer/reject functionality to our ringtone. Two other KuneriLite calls will do the job (note that we’ll reuse the LoadVars instance defined above):

    answer.onPress = function()
    {
    	commandOutput.text = "Answering call... ";
     
    	loader.onLoad = callCommandHandler;
     
    	loader.load("http://127.0.0.1:2001/Basic/ring?klCommand=answercall");
    }
    reject.onPress = function()
    {
    	commandOutput.text = "Rejecting call... ";
     
    	loader.onLoad = callCommandHandler;
     
    	loader.load("http://127.0.0.1:2001/Basic/ring?klCommand=hangupcall");
    }
    function callCommandHandler()
    {
    	commandOutput.text += this.toString();
    }

    Important note: since KuneriLite ringtone plugin already handles device answer and reject keys (the green and red one) you could avoid implementing your custom buttons in ringtone SWF (thanks Jukka for the reminder!)

    Step 2: Setting and unsetting the ringtone

    Now, it’s time to build the “main” SWF application, that is the one that the user would launch from phone menu to manage its FlashLite ringtones.

    As usual, let’s create a basic interface, with this layout:
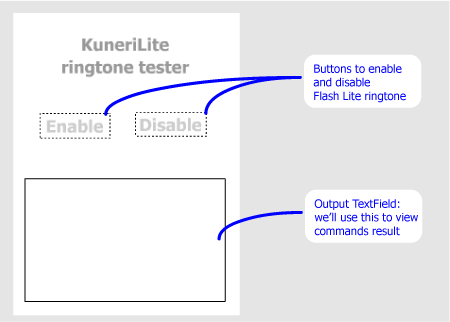
    Now, let’s add the necessary ActionScript code to our Buttons.
    This is for the enable button:

    enableButton.onPress = function()
    {
    	commandOutput.text = "Enabling ringtone..";
     
    	var loader:LoadVars = new LoadVars();
     
    	loader.onLoad = handleResponse;
     
    	loader.load("http://127.0.0.1:1001/Basic/ring?klCommand=enableringswf&klPath=ringtone.swf");
    }

    And similarly, this is for the disable button:

    disableButton.onPress = function()
    {
    	commandOutput.text = "Disabling ringtone..";
     
    	var loader:LoadVars = new LoadVars();
     
    	loader.onLoad = handleResponse;
     
    	loader.load("http://127.0.0.1:1001/Basic/ring?klCommand=disableringswf&klPath=ringtone.swf");
    }

    And here’s the handler, used by both commands calls, to print out the KuneriLite response error code:

    function handleResponse()
    {
    	commandOutput.text += " Error code: " + this.klError;
    }

    Step 3: building and testing

    Building a KuneriLite app is easy as always, but you need to follow these 4 specific steps to make the ringtone correctly work:

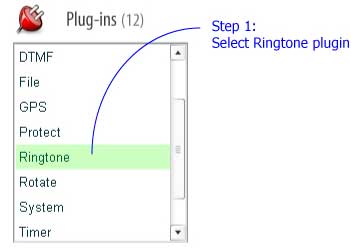
    1. Select Ringtone plugin
    2. Place your ringtone SWF in a separate folder, containing only that SWF, and then select it on Wizard Step 2
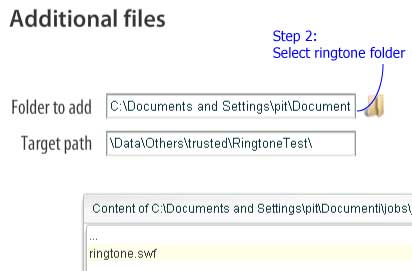
    3. Select the ringtone setter as main SWF
    4. Since Ringtone plugin needs signing, on Step 3 fill in the certificate infos

    Once done, just compile and transfer your SIS on your phone, install and launch it:

    • on main app screen, click the enable button
    • check the command output, to see if the command executed successfully: you should see this message
      Enabling ringtone... Error code: 0
    • if yes, just close the app and call your own phone, and your FlashLite ringtone will magically appear!
    • within the ringtone SWF you will see the caller’s name (if available on your phonebook), otherwise its phone number
    • to answer or reject the incoming call, simply use the buttons we previously placed on stage

    That’s it!

    Conclusions

    Now, add this with the other KuneriLite features, and you could end up having:

    • browsable ringtones catalogs, directly downloadable from your FlashLite app
    • ringones for specific contacts (a phonebook plugin would be great!)
    • location-based ringones!

    Isn’t this enough?

     
    • José Xavier 6:14 pm on October 8, 2008 Permalink

      Hi,
      Can i translate your tutorial to portuguese to post in my blog and ofcourse i’ll say that tutorial is yours… sorry my english.
      :)

    • Jukka 11:07 am on October 9, 2008 Permalink

      Hi Alessandro,
      awesome tutorial as usual :)

      One comment: Handling answer and reject buttons in Flash Lite is actually unnecessary, since KuneriLite ringtone plugin handles the ‘green’ and ‘red’ dialkeys.
      They are naturally used when answering a call ;)

    • pit 11:42 am on October 9, 2008 Permalink

      Hi all!

      @José: sure, feel free to translate it to portuguese!

      @Jukka: thanks for the reminder! I’ve added this info to the article :)

  • pit 9:33 am on October 6, 2008 Permalink | Reply
    Tags: , , , , s60 5th edition, , touch scrolling, touch ui   

    Touch and J2ME part 1: how scroll an image 

    When you start writing your first app for the new S60 5th edition platform you’ll find that, among the first things to deal with, there is interface scrolling: when playing with touchscreen devices, users expect to be able to interact with on-screen objects by simple stylus/finger gestures, rather than by an old-fashion, on-screen keyboard.

    Today, we’ll see how to implement touch scrolling in Java ME in a simple scenario: scrolling a large Image, that doesn’t fit on the device display.

    A sample MIDlet showing this code in action is available on the emulator page: Touch scrollable image in action.

    Source Code: ScrollableImageCanvas class

    Let’s start defining the main class, that will extend the Canvas object:

    public class ScrollableImageCanvas extends Canvas
    {
    {

    Now, we define properties that we’ll use to manage:

    • image size
    • image translation
    • user touch interaction
    // image-related properties
    int imageHeight = 0;
    int imageWidth = 0;
    Image image = null;
    // scroll properties
    protected int translationX = 0;
    protected int translationY = 0;
     
    // touch properties
    protected int lastPointerX = -1;
    protected int lastPointerY = -1;

    Class constructor is quite straightforward, and only needs an Image as argument:

    public ScrollableImageCanvas(Image image)
    {
    	this.image = image;
    	this.imageWidth = image.getWidth();
    	this.imageHeight = image.getHeight();
    }

    Also paint() implementation is simple, since it simply draws the given Image at current translation x and y coordinates:

    protected void paint(Graphics g)
    {
    	g.setColor(0xffffff);
    	g.fillRect(0, 0, getWidth(), getHeight());
    	g.drawImage(image, - translationX, - translationY, Graphics.TOP | Graphics.LEFT);
    }

    Finally, we must implement the touch-based scrolling functionality. To do this, we’ll override the 3 pointer handlers provided by Canvas objects:

    • pointerPressed: called when the pointer is pressed
    • pointerReleased: called when the pointer is released
    • pointerDragged: called when the pointer is dragged
    protected void pointerPressed(int x, int y)
    {
    	lastPointerX = x;
    	lastPointerY = y;
    }
    protected void pointerReleased(int x, int y)
    {
    	lastPointerX = -1;
    	lastPointerY = -1;
    }
    protected void pointerDragged(int x, int y)
    {
    	scrollImage(lastPointerX - x, lastPointerY - y);
    	lastPointerX = x;
    	lastPointerY = y;
    }

    The scrollImage() method implementation follows. What it does is:

    • increment the current translation x and y coordinated by the given x and y deltas
    • normalize the new translation x and y coordinates, so that Image will not go out of bounds
    void scrollImage(int deltaX, int deltaY)
    {
    	if(imageWidth > getWidth())
    	{
    		translationX += deltaX;
    		if(translationX < 0)
    			translationX = 0;
    		else if(translationX + getWidth() > imageWidth)
    			translationX = imageWidth - getWidth();
    	}
     
    	if(imageHeight > getHeight())
    	{
    		translationY += deltaY;
     
    		if(translationY < 0)
    			translationY = 0;
    		else if(translationY + getHeight() > imageHeight)
    			translationY = imageHeight - getHeight();
    	}
     
    	repaint();
    }

    Complete class source code is available here: ScrollableImageCanvas.java.

    If you like this article, feel free to rate it on Forum Nokia Wiki.

    Further development

    A lot of improvements can be done to the code presented in this article. Just some examples are:

    • scrollbars: a fundamental element to let the user know how much he can scroll both in vertical and horizontal directions
    • smooth scrolling: using some inertia when applying scrolling movement will make the whole scrolling effect a lot more realistic
     
    • truf 11:44 am on October 7, 2008 Permalink

      Looking forward for part 2.

    • Bhaskar Nag 8:51 am on November 5, 2008 Permalink

      Your site is very strong in contents of j2me.I got my required codes in j2me from your site.please send me lots of j2me (mobile application code) in my mentioned emailid bellow,I would be highly obliged.
      bhaskar.nag@rediffmail.com
      Thanking You.
      Your’s truely.
      Bhaskar Nag.

    • kamil inal 1:54 pm on November 6, 2009 Permalink

      Thanks for this article:)

    • ankush 9:00 am on April 16, 2011 Permalink

      thanx a lot .. :D

    • abah 1:40 pm on September 16, 2011 Permalink

      thanks! it helps me! :D

  • pit 12:16 am on October 4, 2008 Permalink | Reply
    Tags: amms, , , , jsr234,   

    Nokia S60 5th edition and Java: pointerPressed() to the rescue? 

    Let’s be honest: how many of you usually implement pointer handlers when writing Java ME applications?

    It’s a matter of fact: touch-based devices are mostly Windows Mobile based, and there’s never been deep love between Microsoft smartphones and MIDlets. SonyEricsson and Motorola tried the way with some similar devices too, but without great success, cause also an audience (and a technology) not yet mature enough for the mobile touch revolution, officially started by the loved/hated (choose the one you prefer) iPhone.

    Now that Nokia finally introduces touchscreen on its top devices, things should finally start to change. Some Java ME frameworks (e.g.: TWUIK) already offer powerful touch-based interfaces (just check out their video gallery), but I’ll bet my 2 cents that we’ll see a whole lot more iPhone-style Java ME apps in the next few weeks.

    Touch apart, for those of you wondering about the long awaited and ever wanted OverlayControl and brothers from AMMS, no luck: 5th edition still lacks them all and, as S60 3rd edition FP2, only supports music and audio3d capabilities.

    Generally speaking, S60 5th edition introduced really (really!) few news for Java developers (apart from the touch interface, of course): Is this a symptom of Java maturity, or of its approaching deadline? And, above all, isn’t this question a bit old..?

     
    • tiger79 9:11 am on October 6, 2008 Permalink

      well its nice to see nokia taking over some succesfull formulas.. it’s always better to steal a good idea than create a bad one urself :D
      and i’m one of those who actually believe j2me is approaching its deadline.. too many (better) options are available or are coming (iphone/android)… if j2me was a platform/language that is evolving it would be otherwise, but we have been waiting 4 years now for midp 3.0 and still its only a draft.. guess it might come out in a year or two (maybe) but the market will be so fragmented at that point that it will be a suicide mission…
      just my 2 (pessimistic) cents ;)

c
compose new post
j
next post/next comment
k
previous post/previous comment
r
reply
e
edit
o
show/hide comments
t
go to top
l
go to login
h
show/hide help
shift + esc
cancel