Tagged: kunerilite Toggle Comment Threads | Keyboard Shortcuts

  • pit 3:02 pm on October 8, 2008 Permalink | Reply
    Tags: , kunerilite, , ringtones, , ,   

    Create your first Flash Lite ringtone with KuneriLite 

    For those of you who missed it (really??) latest KuneriLite versions have added support for Flash Lite ringtones, one of the coolest FlashLite features around!!

    Today, we’ll see how it is simple to create a FlashLite ringtone with caller-id support and an application that allows users to easily set and unset it.

    Step 1: The FlashLite ringtone

    To start, we’ll build a really simple FlashLite ringtone.

    Let’s start building a simple interface, with these elements:
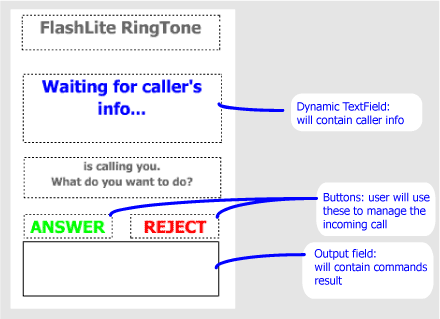
    Now it’s time to add some ActionScript to our interface. So, let’s open frame 1 of our Actions layer.

    Important note: when using KuneriLite from a ringtone SWF, you MUST use port 2001.

    First, we’ll define a method to retrieve caller infos, and display it, depending on the returned data:

    var loader:LoadVars = new LoadVars();
     
    getCallerName();
     
    function getCallerName()
    {
    	commandOutput.text = "Getting caller's info... ";
     
    	loader.onLoad = callerNameHandler;
     
    	loader.load("http://127.0.0.1:2001/Basic/ring?klCommand=callerid");
    }
    function callerNameHandler()
    {
    	commandOutput.text += this.toString();
     
    	if(this.klError != 0)
    	{
    		callerName.text = "Command error: " + this.klError;
    	}
    	else if(this.klName != undefined)
    	{
    		callerName.text = this.klName;
    	}
    	else
    	{
    		callerName.text = this.klNumber;
    	}
    }

    And then, let’s add the call answer/reject functionality to our ringtone. Two other KuneriLite calls will do the job (note that we’ll reuse the LoadVars instance defined above):

    answer.onPress = function()
    {
    	commandOutput.text = "Answering call... ";
     
    	loader.onLoad = callCommandHandler;
     
    	loader.load("http://127.0.0.1:2001/Basic/ring?klCommand=answercall");
    }
    reject.onPress = function()
    {
    	commandOutput.text = "Rejecting call... ";
     
    	loader.onLoad = callCommandHandler;
     
    	loader.load("http://127.0.0.1:2001/Basic/ring?klCommand=hangupcall");
    }
    function callCommandHandler()
    {
    	commandOutput.text += this.toString();
    }

    Important note: since KuneriLite ringtone plugin already handles device answer and reject keys (the green and red one) you could avoid implementing your custom buttons in ringtone SWF (thanks Jukka for the reminder!)

    Step 2: Setting and unsetting the ringtone

    Now, it’s time to build the “main” SWF application, that is the one that the user would launch from phone menu to manage its FlashLite ringtones.

    As usual, let’s create a basic interface, with this layout:
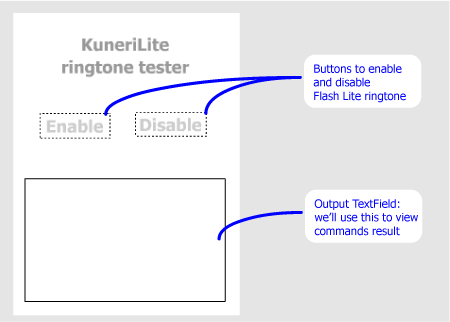
    Now, let’s add the necessary ActionScript code to our Buttons.
    This is for the enable button:

    enableButton.onPress = function()
    {
    	commandOutput.text = "Enabling ringtone..";
     
    	var loader:LoadVars = new LoadVars();
     
    	loader.onLoad = handleResponse;
     
    	loader.load("http://127.0.0.1:1001/Basic/ring?klCommand=enableringswf&klPath=ringtone.swf");
    }

    And similarly, this is for the disable button:

    disableButton.onPress = function()
    {
    	commandOutput.text = "Disabling ringtone..";
     
    	var loader:LoadVars = new LoadVars();
     
    	loader.onLoad = handleResponse;
     
    	loader.load("http://127.0.0.1:1001/Basic/ring?klCommand=disableringswf&klPath=ringtone.swf");
    }

    And here’s the handler, used by both commands calls, to print out the KuneriLite response error code:

    function handleResponse()
    {
    	commandOutput.text += " Error code: " + this.klError;
    }

    Step 3: building and testing

    Building a KuneriLite app is easy as always, but you need to follow these 4 specific steps to make the ringtone correctly work:

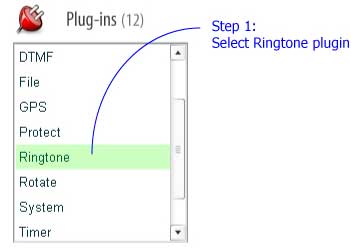
    1. Select Ringtone plugin
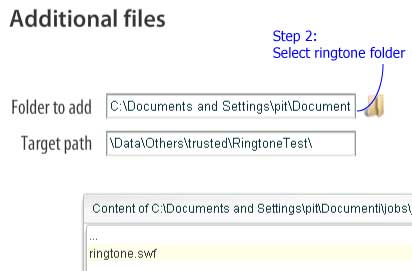
    2. Place your ringtone SWF in a separate folder, containing only that SWF, and then select it on Wizard Step 2
    3. Select the ringtone setter as main SWF
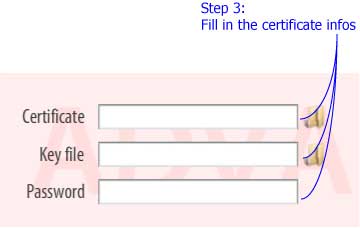
    4. Since Ringtone plugin needs signing, on Step 3 fill in the certificate infos
    Once done, just compile and transfer your SIS on your phone, install and launch it:

    • on main app screen, click the enable button
    • check the command output, to see if the command executed successfully: you should see this message
      Enabling ringtone... Error code: 0
    • if yes, just close the app and call your own phone, and your FlashLite ringtone will magically appear!
    • within the ringtone SWF you will see the caller’s name (if available on your phonebook), otherwise its phone number
    • to answer or reject the incoming call, simply use the buttons we previously placed on stage

    That’s it!

    Conclusions

    Now, add this with the other KuneriLite features, and you could end up having:

    • browsable ringtones catalogs, directly downloadable from your FlashLite app
    • ringones for specific contacts (a phonebook plugin would be great!)
    • location-based ringones!

    Isn’t this enough?

     
    • José Xavier 6:14 pm on October 8, 2008 Permalink

      Hi,
      Can i translate your tutorial to portuguese to post in my blog and ofcourse i’ll say that tutorial is yours… sorry my english.
      :)

    • Jukka 11:07 am on October 9, 2008 Permalink

      Hi Alessandro,
      awesome tutorial as usual :)

      One comment: Handling answer and reject buttons in Flash Lite is actually unnecessary, since KuneriLite ringtone plugin handles the ‘green’ and ‘red’ dialkeys.
      They are naturally used when answering a call ;)

    • pit 11:42 am on October 9, 2008 Permalink

      Hi all!

      @José: sure, feel free to translate it to portuguese!

      @Jukka: thanks for the reminder! I’ve added this info to the article :)

  • pit 3:44 pm on July 18, 2008 Permalink | Reply
    Tags: blog uploader, , , , , kunerilite, mobile blog, , mtv community, ,   

    Mobile Mtv Blog Uploader: yet another FlashLite and J2ME apps! 

    As told some days ago, MtvMobile launched 2 phones with its initial offer as virtual mobile operator. And, for these 2 phones (a Nokia 5320 and a SE W760), 2 cool applications were lauched. I’ve already talked about Mtv OnDemand, a FlashLite and Java ME streaming video player that allows users to view selected MTV videos, and download related content (like ringtones and wallpapers).

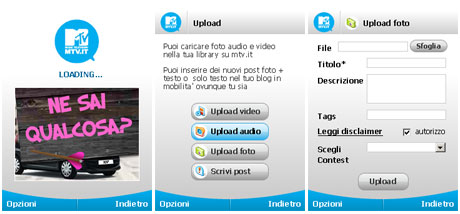
    Now it’s time to view the other one: it’s called Mtv.it Blog, and it’s a simple and effective mobile blog uploader.

    Mtv.it blog Uploader screenshots

    Using this app, users are able to upload contents (photos, videos, audio or simple text) from their mobile phone directly on their Mtv blog. As for Mtv OnDemand, there are both a Java ME and a Flash Lite version of this app, quite identical in both their interface and functionalities.

    As for the other one, I’ll post complete videos of this app as soon as I have it working again :)

     
    • Leonardo 8:12 pm on July 20, 2008 Permalink

      Ciao Alessandro!

      seems a really cool app! Congrats ;)

      Leonardo

    • pit 10:09 am on July 21, 2008 Permalink

      Ciao Leonardo!

      thanks for your comment :)

      Pit

    • Li Yong Fei 1:54 pm on July 21, 2008 Permalink

      Hi, Pit

      Your blog looks very greate, I have added your blog in my “flash Lite Blog”, hope more flash lite developer can visit your blog, and give us more experience, Thanks for your share!.

      Li Yong fei

    • pit 2:03 pm on July 21, 2008 Permalink

      Hi Li Yong Fei,

      thanks for your feedback! I’m really glad of being featured on your great blog :)

      Pit

      PS: I’ve updated my blogroll too ;)

    • Satya 1:11 pm on October 1, 2008 Permalink

      Really good article. I have been following your blog for last 3 months. You have good knowledge
      on Mobile(cell phone) Industry and happenings. Please continue the good work. Thank you.

    • pit 1:15 pm on October 1, 2008 Permalink

      Thanks for your feedback Satya!

      I’ve been less active on this blog in this last weeks, due to a lot of work to do :( anyway, I’m already working on some new tutorials, so expect to see new code really soon!

  • pit 1:02 pm on June 25, 2008 Permalink | Reply
    Tags: , , geotagging, , image thumbs, kunerilite, rest api   

    FliKun: KuneriLite based FlashLite photo uploader for Flickr 

    Today, we’ll see how it’s possible to build a Flickr uploader in FlashLite using KuneriLite, geotagging our photos with the current GPS location.

    You can download the current FliKun version (for FlashLite 3.0) here: FliKun_3rd_edition_unsigned.sis (please read the notes at the end of this article).

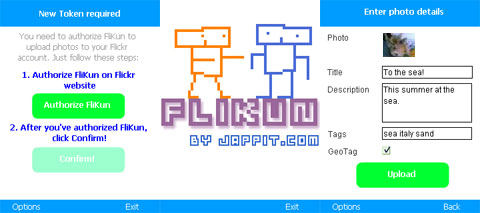
    Flikun Screenshots

    So, let’s start from the beginning.

    Flickr API

    To upload photos to Flickr we’ll need to use Flickr API: this way we’ll be able to authenticate the user and upload/geotag photos using its REST services, all from within our application.

    First thing we should do is to setup an API key for our service, going on the request page. Here you have to fill out the application details, with special care to the authentication method we want to use: suitable choices for our needs would be both desktop and mobile application authentications:

    • With the first option the user will be redirected to a Flickr page, from within our application, where he should authenticate and grant necessary permissions to our application.
    • With the second option we can let the user generate a mini-token from a dedicated page, using his desktop browser, and then tell him to insert this mini-token within in our application.

    In both cases, we will get a token that will be used for all future uses of our application, so there would be no more need to authenticate the user after the first time.

    KuneriLite Plugins

    In our application, we will need to access these functionalities:

    • Retrieve photos stored in phone’s gallery
    • Make thumbs to show them in our application
    • Start the GPS and retrieve user’s current location
    • Upload stored photo on Flickr server

    So, we’ll need to use the following KuneriLite plugins:

    • GPS: we’ll use the start command to start GPS, and the read command to read current location
    • File: with dir command we’ll be able to list files in phone’s gallery folders. We’ll use this also to store textual infos, like the user token
    • Upload/Download: with this plugin we’ll upload the photos to Flickr website, using its API, and create the thumbs (with the resize command) to show them within our application

    Get a token

    We’ll use the desktop authentication method, so these are the steps required to authenticate the user, and to get his token:

    • Get a frob, with the Flickr flickr.auth.getFrob method
    • Generate the desktop authentication URL with the given frob
    • Send the user to the generated URL, using the phone browser, where he should authenticate and grand permissions to our application
    • When the user is back to our application, we will finally get his authentication token with the flickr.auth.getToken Flickr method

    All these Flickr API calls need to be signed with an api_sig parameter, that is explained here: Flickr Authentication API page (in the Signing paragraph). To generate it in our FlashLite application, we’ll use the following function:

    function getApiSignature(args:Object)
    {
    	var authSig:Array = new Array();
     
    	for(var key:String in args)
    	{
    		authSig.push(key + args[key]);
    	}
    	authSig = authSig.sort();
     
    	var apiSig:String = this._md5.hash(<API_SECRET> + authSig.join(''));
     
    	return apiSig;
    }

    where <API_SECRET> is the API Secret associated to your API Key (you can see both of them on Flickr API Keys page).

    If all has gone well, we will finally get the user token, that we must store somewhere (for example using SharedObject, or within a local file using KuneriLite file plugin).

    Show phone gallery photos

    Since we’ll use S60 3rd edition phones, we’ll search for photos in these folders: “C:\Data\Images\” and “E:\Images\”. Since on these phones photos will be stored in many subfolders, we’ll search within them, using “/s” argument within KuneriLite dir call. Also, we should avoid listing photo thumbs, that are stored
    in subfolders named “_PAlbTN”, so it’ll be easy to spot out and avoid to get them.

    Once we have the photo paths, we can use the KuneriLite resize command to resize them to our preferred size, and use those thumbs within our application. In doing this, we should care for the following points:

    • It’s not possible to load more than 5 resources at once, so we should generate and load thumbs in a progressive manner, otherwise we will have lost calls (without any feedback or exception) within our application
    • While loading a thumb in a MovieClip, we should take care not to remove the Clip while it’s loading (for example, because the user has navigated to another screen). Doing this we’ll avoid the issue described here.

    Enter photo details and upload it!

    Once the user has selected a photo, we should let him enter photo data (title, description and tags), and then let him choose if he wants to tag with his location the photo itself.

    In this case, we can use the approach described in this other article to retrieve the current GPS location: Displaying gps position in flashlite using google static maps and kunerilite.

    Once we have the GPS location coordinates, we can finally upload the photo to Flickr website with the upload API. Since the upload API itself requires, apart from the file itself, to send the other params within the POST body, we should use some sort of server proxy, since KuneriLite upload command does not allow to post them this way. What we could do is to send the textual parameters within the upload URL, and then let our proxy POST them to Flickr server.

    Get FliKun!

    This first release of FliKun is very (very!) alpha, so try it at your own risk :) jokes apart, there are still many points open (like the horrible graphics!), so expect new versions as soon as I’ve got the time to work more on it!

    Download FliKun_3rd_edition_unsigned.sis (for FlashLite 3.0).

    Currently known issues/bugs are:

    • Sometimes upload fails, especially when using some special characters
    • There is no upload progress bar (but will be added very soon)
    • File upload fails (with error code -4) when photo size is bigger than approx 450 Kb (I’m currently working to solve this)

    For any other bugs you may encounter, please leave comment on this post! Thanks :)

    Finally note that, to use the GPS feature, you’ll need to sign the SIS file with a valid certificate.

     
    • Ugur 4:18 pm on June 27, 2008 Permalink

      Hey Ale, will you publish source code as well?

    • Nishant 7:13 am on June 30, 2008 Permalink

      Hey,

      Are you going to publish the source code sometime please?

      Nishant

    • pit 8:48 am on June 30, 2008 Permalink

      Hi Ugur & Nishant!

      I’ll publish the code as soon as I’m able to clean it up a bit, fix current bugs and remove some code parts that I cannot currently publish (since they’re part of another product).

      Anyway, my current plans are to make really soon another tutorial with main steps and code snippets taken from FliKun, to see how it was easy to build such an application using KuneriLite features.

      Pit

    • Yossi 11:00 pm on September 19, 2008 Permalink

      Hello, I’m not able to install the application on my Nokia N73-1. I have FlashLite3.0 installed on my cellphone.It says:” certificate error:referre to the application supplier” when trying to install the application.In addition,when I tried to sign the application at www. symbiansigned.com I got the following error: “FAILURE: Submitted .sis file uses a UID that is not allocated to the account holder matching this email address (0xaf161915 0xa0002443 0xa0002445 0xa0002449 0xa0002446 0xa000244c 0xa0002636 0xa0002637 )”.

      Thank you, Yossi.

    • Partha S Sadhukhan 5:56 pm on October 12, 2008 Permalink

      We would like to get a slightly customised version of Flicker photo upload software. Kindly send us your contact information for further interactions on this.

    • Symbian Blogger 8:38 pm on May 16, 2009 Permalink

      I found your blog on google and read a few of your other posts. I just added you to my Google News Reader. Keep up the good work. Look forward to reading more from you in the future.

    • boyama oyunları 9:38 am on June 22, 2009 Permalink

      We would like to get a slightly customised version of Flicker photo upload software. Kindly send us your contact information for further interactions on this.

    • Mirko Meier 8:30 pm on June 25, 2009 Permalink

      Hi,
      have you published the source code for FliKun yet or code snippets?
      I tried to install your sis file on a Nokia 5800 with FlashLite 3.1 but i always get “certificate error:referre to the application supplier”.

      Could you please contact me or send your contact information because I am very much interested in your FliKun solution.

      Thanks in advance.
      Mirko

    • pit 5:11 pm on July 1, 2009 Permalink

      Hi boyama,

      feel free to contact me by email, so we can discuss about the details of your idea. My email is: info [AT] jappit [DOT] com

      Thanks,
      Pit

    • medyum 11:53 am on July 27, 2009 Permalink

      Hello, I’m not able to install the application on my Nokia N73-1. I have FlashLite3.0 installed on my cellphone.It says:” certificate error:referre to the application supplier” when trying to install the application.In addition,when I tried to sign the application at ymbiansigned.com I got the following error: “FAILURE: Submitted .sis file uses a UID that is not allocated to the account holder matching this email address (0xaf161915 0xa0002443 0xa0002445 0xa0002449 0xa0002446 0xa000244c 0xa0002636 0xa0002637 )”.

      Thank you, Medyum

  • pit 1:46 pm on June 12, 2008 Permalink | Reply
    Tags: , , google static maps, , kunerilite,   

    Displaying GPS position in FlashLite using Google Static Maps and KuneriLite 

    Today’s tutorial is about using Google Maps static images, and GPS data, to display maps in a FlashLite application using KuneriLite.

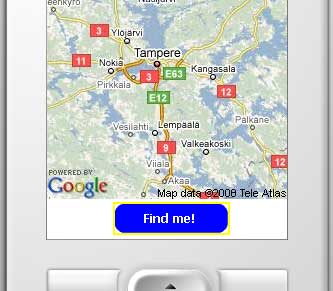
    FlashLite KuneriLite Google Maps application screenshot

    Prerequisites

    Get your own Google Maps API key

    To use Google Maps services, you should have a Google Maps API key. If you do not have one, you can go here:

    http://code.google.com/apis/maps/signup.html

    and signup for your API key.

    Download and install KuneriLite

    KuneriLite is a tookit that extends FlashLite capabilites allowing applications to access native Symbian functionalities, like file writing, or reading GPS data.

    To proceed in this tutorial, you must download and install KuneriLite: KuneriLite download page.

    Create FlashLite application

    Create your FlashLite movie

    In this example, we’ll use FlashLite 2.1, but porting it to other (older or newer) FlashLite versions will be quite straightforward. So, after you’ve created an empty FlashLite movie, follow this simple steps:

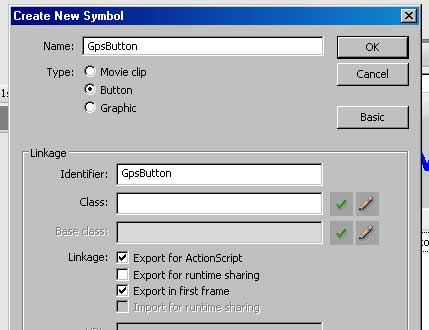
    • Create a Button by going to Insert -> New Symbol…
    • enter GpsButton as name
    • check the Export for ActionScript and Export in first frame checkboxes

    GpsButton properties

    • Now, design your Button as you prefer, for example placing a big “Find me!” label on it
    • After you’ve finished designing your Button, place it on movie root, in the lower part of the stage, as in the attached screenshot, and give it startButton as Instance Name

    Place GpsButton on stage

    Enter ActionScript code

    On movie root, create a new layer called Actions, and open its ActionScript editor. We’ll start defining some properties:

    // Enter your api key here
    var apiKey = 'API_KEY';
     
    //If you're using non-commercial version of KuneriLite, you'll not need to change this
    var kuneriPath = 'http://127.0.0.1:1001/Basic/';

    Now, we’ll define some useful functions that we’ll use in our code:

    //We'll call this function when some KuneriLite related errors occur
    function kuneriError(error:String)
    {
    	trace("KuneriLite error: " + error);
    }
     
    //This function will do all calls to KuneriLite servers
    //and call the given handler passing response values as argument
    function kuneriLoad(url, handler)
    {
    	var loader:LoadVars = new LoadVars();
     
    	loader.onLoad = function()
    	{
    		handler(this);
    	}
    	trace("LOADING: " + url);
     
    	loader.load(url);
    }

    Now, let’s code the Button-related logic. When the user presses the startButton we want to:

    • start the GPS
    • retrieve the current GPS position
    • display a map centered in the retrieved GPS position

    To get full infos about about KuneriLite GPS plugin, you can check the related Wiki page: http://wiki.kunerilite.net/index.php?title=GPS_plugin

    We begin starting the GPS on gpsButton press, using the start klCommand:

    startButton.onPress = function()
    {
    	kuneriLoad(kuneriPath + 'GPS?klCommand=start', gpsStarted);
    }
    function gpsStarted(res:LoadVars)
    {
    	if(res.klError == 0 || res.klError == -11)
    	{
    		trace("GPS started");
     
    		kuneriLoad(kuneriPath + 'GPS?klCommand=read', gpsDataRead);
    	}
    	else
    	{
    		kuneriError("Error starting GPS!");
    	}
    }

    The gpsStarted() handler will:

    • check if there is no error (klError = 0) or if GPS is already started (klError = -11). For full errors list associated with GPS plugin, check KuneriLite Wiki page: http://wiki.kunerilite.net/index.php?title=GPS_plugin
    • if there’s an error starting the GPS, call our kuneriError() function defined above
    • if GPS is correctly started, it will make a second call to KuneriLite, this time to retrieve current GPS position (klCommand=read)

    This second call to KuneriLite will call gpsDataRead() handler, defined below:

    function gpsDataRead(res:LoadVars)
    {
    	if(res.klError == 0)
    	{
    		if(res.klPosLatitude != undefined)
    		{
    			var lat = res.klPosLatitude;
    			var lng = res.klPosLongitude;
     
    			trace("POSITION: " + lat + ", " + lng);
     
    			loadMap(lat, lng);
    		}
    		else
    		{
    			kuneriLoad(kuneriPath + 'GPS?klCommand=read', gpsDataRead);
    		}
    	else
    	{
    		kuneriError("Error retrieving GPS position!");
    	}
    }

    This handler, as above, will check if there is any error raised by KuneriLite and, if not, will check if latitude and longitude coordinates are available, by checking response klPosLatitude and klPosLongitude property values. If they’re not available, a new call to read klCommand is done, otherwise the following loadMap() function is called.

    function loadMap(lat:Number, lng:Number)
    {
    	var mapClip:MovieClip = _root.createEmptyMovieClip('mapClip', _root.getNextHighestDepth());
     
    	mapClip._x = 0;
    	mapClip._y = 0;
     
    	var mapWidth = 240;
    	var mapHeight = 280;
     
    	var loader:MovieClipLoader = new MovieClipLoader();
     
    	var mapUrl:String = 'http://maps.google.com/staticmap?center=' +
    		lat + ',' + lng + '&amp;format=jpg&amp;zoom=8&amp;size=' +
    		mapWidth + 'x' + mapHeight + '&amp;key=' + apiKey;
     
    	loader.loadClip(mapUrl, mapClip);
    }

    The above function:

    • attaches a new empty movie clip to movie root
    • places it to coordinates (0,0)
    • use a MovieClipLoader to load a 240×280 map image, in jpeg format, in the empty clip

    Done that, you can actually test your FlashLite movie

    Test your FlashLite application

    Test on PC

    To test your application without deploying on real device, you must follow these simple steps:

    • Start KuneriLite emulator with default settings (port: 1001, key: Basic)
    • Start your FlashLite movie
    • Press Find Me! and wait for your image to be loaded (of course, being an emulator, the GPS position will be not real :))

    For more infos about KuneriLite Emulator, you can go here: KuneriLite Emulator Wiki page

    Test on real device

    To test your app on real device, you must package your SIS application using KuneriLite Wizard, following these steps:

    KuneriLite Emulator screenshot

    • Export your FlashLite movie
    • Create a new KuneriLite project
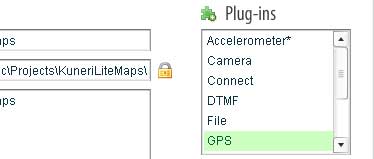
    • Enter application name and other data, checking GPS from the available plugins
    • Check “Use external player” option if you developed for a development player (2.x or 3.x) and would like to launch the application using one of those players
    • It is also recommended to always check “Use stub” option
    • Select the exported SWF as project Main SWF

    Note: to use GPS you should sign your application, specifying certificate, key and password in KuneriLite Wizard interface. Otherwise, your application will not be able to access GPS functionalities.

    For more infos about KuneriLite Wizard, you can go here: KuneriLite Wizard Beginner’s Guide

    Source code and resources

     
    • Ugur 2:16 pm on June 12, 2008 Permalink

      Great tutorial Alessandro, kudos!

      FYI – couldn’t get the ZIP file, gives 404

      cheers,

      Ugur.-

    • Pit 2:20 pm on June 12, 2008 Permalink

      Thanks Ugur!

      I missed a letter in the ZIP name… now It should work :)

      Pit

    • Pasi Manninen 6:49 am on June 14, 2008 Permalink

      Great Tutorial!

      Br,
      Pasi Manninen.

    • senthil kumar 1:55 pm on June 15, 2008 Permalink

      Hi am trying to get microsoft virtual map into my flash lite. How i can get the virtual map into flash lite?

    • Hudarsono 6:40 pm on July 19, 2008 Permalink

      This tutorial uses Symbian, how about android?

    • java.padawan 11:53 pm on February 10, 2009 Permalink

      I created a simple GPS tutorial using android.

      http://www.androidph.com/2009/02/app-10-beer-radar.html

  • pit 2:20 pm on May 20, 2008 Permalink | Reply
    Tags: , integration, kunerilite, mobile development   

    Random thoughts after 2 months on KuneriLite 

    Yesterday I’ve finished 2 projects developed using FlashLite 3.0 in conjunction with KuneriLite. Now, it’s time for some considerations.

    About FlashLite

    FlashLite Gallery screenshot

    My opinion: FlashLite is far from being a mature platform for mobile development. Why?

    No access to native phone functionalities.

    This means no GPS, no data storage (apart from text), no video/audio capture, and much more. Since one of mobile apps strengths is in its integration with the device itself, this sounds like a big limitation (but someway it’s something like first J2ME years). This could be due to a different perspective and target users/developers, but having a powerful platform like Flash being limited to casual games or screensavers looks a bit odd to me.

    Odd, senseless behavior.

    What happens if you try to load more that 5 resources together? They won’t load, simple.

    Or want to quit your application? You can, but at conditions: user must press some key for quit to work and, even if he does, there’s the chance that the app simply won’t close.

    And if a network or local resource, for example loaded via LoadVars, is not available? You’ll have a terrible popup telling the user that he has a “Problem with content: -6″, or other similar, anti-usability things.

    Security encounters insanity.

    Since FlashLite 3.0, there was a nice introduction, with the new player Security settings. About this there are good articles from Ugur and chall3ng3r that point out this has caused problems in having, for example, an application loading both local and remote resources. Fortunately, there are workarounds that allow to overcome some of the limitations involved in this (like using the notorious “Trusted” folder), but we’re still far from painless development :)

    Good news under the sun.

    Bill Perry from Adobe posted back, few days after the posts from Ugur and chall3ng3r, with the news that Adobe is working to solve some of the issues pointed out, and this is absolutely a welcome kind of feedback from Adobe team!

    About KuneriLite

    KuneriLite Wizard screenshot

    Install, plug, use.

    When you must merge 2 technologies to overcome their own limitations, it’s already a pain. So, when you do it, you want simple, immediate tools, that would make your work easier, not harder. With KuneriLite you have exacly this: an easy-to-use, understand and test tool. You have an intuitive Wizard that will allow you to create, setup and SIS package all your apps, and an emulator for easy testing and debugging. This IS what we want!

    Support matters!

    Briefly said: KuneriLite team is fantastic! Having worked with their product for more than 2 months, I can say to be more than happy for their help and support. You can find all the infos you want on their forums an Wiki pages.

    Yes, but what?

    Ok, maybe you don’t know what KuneriLite is, so here’s a brief introduction: KuneriLite is a tool that allows you to access Symbian native functionalities from your FlashLite application. They (your FlashLite app and KuneriLite) will interact via simple HTTP requests, and results are returned in the classical form of key/value pairs. So said, integration with your app will be quite straightforward.

    Past, present and future.

    Mobile Development is currently undergoing a lot of changes, merging and shuffles.

    FlashLite seems to be trying to find his way by merging with other technologies, from Java (see Jarpa) to Python (FlyerFramework) to Symbian C++ (KuneriLite, Janus, and others) and, why not, Web Runtime. Far from having a definite solution, there’s a lot to see and experiment.

    And we’re here to do it :)

     
  • pit 12:00 pm on April 28, 2008 Permalink | Reply
    Tags: , kunerilite, ,   

    New KuneriLite version with cool improvements 

    KuneriLite is a great tool to extend FlashLite functionalities adding support for native features like local filesystem read/write, camera recording, accelerometer capabilities and much more. All these without the need to have any Symbian knowledge.

    Practically, you interact with KuneriLite engine via localhost calls. For example, if you want to get recursive folder listing starting from current application base path, you can simply do:

    loadVariables("http://127.0.0.1:1001/Basic/file?
    klCommand=dir&klPath=\\&klArgs=/s", targetMc);

    Their tool comes with an integrated wizard and an emulator, to be used with Symbian S60 3rd edition SDK Maintenance Release, to allow full development without the need of a real device.

    KuneriLite logo

    Now they’ve just released 0.9.6.1 version, that fixes issues with Flash Lite 3 and add new cool features, as you can read on their blog, and it’s more than ever worth a try!

     
    • Ugur 2:30 pm on April 28, 2008 Permalink

      Thanks for the post Pit! Great to hear you like it :)

c
compose new post
j
next post/next comment
k
previous post/previous comment
r
reply
e
edit
o
show/hide comments
t
go to top
l
go to login
h
show/hide help
shift + esc
cancel