Updates from May, 2008 Toggle Comment Threads | Keyboard Shortcuts

  • pit 3:46 pm on May 22, 2008 Permalink | Reply
    Tags: image effect, , sliding,   

    J2ME Image effects part 2: sliding transitions 

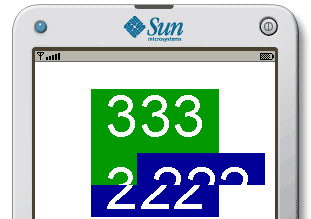
    After an explosive J2ME class, now it’s the time for sliding transition effects. With the following SlidingImage class you’ll be able to seamlessly add both SlideIn and SlideOut effects to your toooo static apps!

    J2ME sliding transition effect screenshot

    As usual, take a look at how this would appear in a real phone, and then proceed with the simple these 1,2,3 steps :)

    1. Download and include in your code the SlidingImage.java class
    2. Instantiate a new SlidingImage:
      SlidingImage image = new SlidingImage(
      	Image.createImage("/image1.png"),
      	10,
      	SlidingImage.SLIDE_OUT);

      These are the constructor arguments:

      • An Image object to be slided
      • The number of pieces of the sliding image
      • The type of slide, can be SlidingImage.SLIDE_IN or SlidingImage.SLIDE_OUT
    3. Start the sliding effect, specifying its direction and duration (in milliseconds):
      image.slide(Canvas.RIGHT, 3000);

      Direction can be one of Canvas properties UP, RIGHT, DOWN and LEFT.

    4. Now you can paint it simply specifying coordinates and an anchor, as usual:
      image.paint(g,
      	100, 100,
      	Graphics.HCENTER | Graphics.VCENTER);
    5. If you remember ExplodingImage class, you can check if effect is ended with the public ended property:
      if(image.ended)
      {
      //effect-end related code
      }
    6. If you want to reset the effect, also changing the sliding image pieces and effect type (slide in or out), you can use the reset() method:
      //to reset changing also slides and type properties
      image.reset(12, SlidingImage.SLIDE_IN);
      //otherwise, to simply reset:
      image.reset();

    You can download source code here:

     
    • Absar 9:14 am on February 10, 2009 Permalink

      nice

    • rohit 11:32 am on September 23, 2010 Permalink

      really nice article.. good work!!

  • pit 2:20 pm on May 20, 2008 Permalink | Reply
    Tags: , integration, , mobile development   

    Random thoughts after 2 months on KuneriLite 

    Yesterday I’ve finished 2 projects developed using FlashLite 3.0 in conjunction with KuneriLite. Now, it’s time for some considerations.

    About FlashLite

    FlashLite Gallery screenshot

    My opinion: FlashLite is far from being a mature platform for mobile development. Why?

    No access to native phone functionalities.

    This means no GPS, no data storage (apart from text), no video/audio capture, and much more. Since one of mobile apps strengths is in its integration with the device itself, this sounds like a big limitation (but someway it’s something like first J2ME years). This could be due to a different perspective and target users/developers, but having a powerful platform like Flash being limited to casual games or screensavers looks a bit odd to me.

    Odd, senseless behavior.

    What happens if you try to load more that 5 resources together? They won’t load, simple.

    Or want to quit your application? You can, but at conditions: user must press some key for quit to work and, even if he does, there’s the chance that the app simply won’t close.

    And if a network or local resource, for example loaded via LoadVars, is not available? You’ll have a terrible popup telling the user that he has a “Problem with content: -6″, or other similar, anti-usability things.

    Security encounters insanity.

    Since FlashLite 3.0, there was a nice introduction, with the new player Security settings. About this there are good articles from Ugur and chall3ng3r that point out this has caused problems in having, for example, an application loading both local and remote resources. Fortunately, there are workarounds that allow to overcome some of the limitations involved in this (like using the notorious “Trusted” folder), but we’re still far from painless development :)

    Good news under the sun.

    Bill Perry from Adobe posted back, few days after the posts from Ugur and chall3ng3r, with the news that Adobe is working to solve some of the issues pointed out, and this is absolutely a welcome kind of feedback from Adobe team!

    About KuneriLite

    KuneriLite Wizard screenshot

    Install, plug, use.

    When you must merge 2 technologies to overcome their own limitations, it’s already a pain. So, when you do it, you want simple, immediate tools, that would make your work easier, not harder. With KuneriLite you have exacly this: an easy-to-use, understand and test tool. You have an intuitive Wizard that will allow you to create, setup and SIS package all your apps, and an emulator for easy testing and debugging. This IS what we want!

    Support matters!

    Briefly said: KuneriLite team is fantastic! Having worked with their product for more than 2 months, I can say to be more than happy for their help and support. You can find all the infos you want on their forums an Wiki pages.

    Yes, but what?

    Ok, maybe you don’t know what KuneriLite is, so here’s a brief introduction: KuneriLite is a tool that allows you to access Symbian native functionalities from your FlashLite application. They (your FlashLite app and KuneriLite) will interact via simple HTTP requests, and results are returned in the classical form of key/value pairs. So said, integration with your app will be quite straightforward.

    Past, present and future.

    Mobile Development is currently undergoing a lot of changes, merging and shuffles.

    FlashLite seems to be trying to find his way by merging with other technologies, from Java (see Jarpa) to Python (FlyerFramework) to Symbian C++ (KuneriLite, Janus, and others) and, why not, Web Runtime. Far from having a definite solution, there’s a lot to see and experiment.

    And we’re here to do it :)

     
  • pit 10:26 am on May 20, 2008 Permalink | Reply
    Tags: effect, explode, , , , ,   

    Let your images explode in J2ME! 

    After a MIDP 1.0 utility to rotate images now time has come for some image fun :)

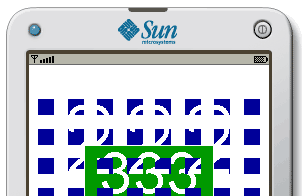
    J2ME Image explode effect screenshot
    When writing mobile applications, it’s always cool to add some effects or transitions. But, while for example FlashLite has a nice builtin support for them, with J2ME you have to hand-code even the simplest movement (and this is the main reason why most J2ME apps are all but attractive).

    So, here’s a first class that you can use to add an “explode” effect to images in a straightforward way. How to do it? Here we come:

    1. Download the ExplodingImage.java source code and put it straight in your project
    2. Instantiate an ExplodingImage this way:
      //get your Image
      Image sourceImage = Image.createImage("/image.png");
      //and then use it in ExplodingImage constructor
      ExplodingImage image = new ExplodingImage(sourceImage , 5, 8, 8);

      The ExplodingImage constructor accepts the following arguments:

      • An Image instance
      • An int representing the “level” for the exploding effect, that is the strength of the effect itself (higher the level, stronger the effect).
      • The last 2 int arguments represent the horizontal and vertical pieces of the exploded image.
    3. Start the explode effect with the explode() method, that will accept the effect duration as argument:
      image.explode(2000L);
    4. To paint it, simply use its paint() method, very similary to the Graphics drawImage() one. For example, in a Canvas paint() method, you can do something like this:
      protected void paint(Graphics g)
      {
      	g.setColor(0xffffff);
      	g.fillRect(0, 0, width, height);
      	image.paint(g, getWidth() / 2, getHeight() / 2, Graphics.HCENTER | Graphics.VCENTER);
      }

      To give the effect a “smooth” animation, you should paint it quite frequently (let’s say, not once per second :)). So, always using Canvas, a sample code could be like this:

      public void run()
      {
      	while(true)
      	{
      		repaint();
       
      		try
      		{
      			synchronized(this)
      			{
      				wait(50L);
      			}
      		}
      		catch(Exception e)
      		{
      			e.printStackTrace();
      		}
      	}
      }
    5. To test if the effect has ended, you can simply access your ExplodingImage ended instance variable:
      if(image.ended)
      {
      	//effect-end related code
      }
    6. And you’re done! See it in action here: J2ME image explode effect in action

    Sample source code is available here:

     
  • pit 10:53 am on May 19, 2008 Permalink | Reply
    Tags: , midp 1.0, rotate image,   

    Rotating images in J2ME using MIDP 1.0 

    So you’re still using MIDP 1.0 uh? And maybe you need to rotate an image?

    J2ME rotate image screenshot

    If this is your case, you could find useful this simple function:

    public static Image rotateImage(Image image, int angle) throws Exception
    {
    	if(angle == 0)
    	{
    		return image; 
    	}
    	else if(angle != 180 && angle != 90 && angle != 270)
    	{
    		throw new Exception("Invalid angle");
    	}
     
    	int width = image.getWidth();
    	int height = image.getHeight();
     
    	int[] rowData = new int[width];
    	int[] rotatedData = new int[width * height];
     
    	int rotatedIndex = 0;
     
    	for(int i = 0; i < height; i++)
    	{
    		image.getRGB(rowData, 0, width, 0, i, width, 1);
     
    		for(int j = 0; j < width; j++)
    		{
    			rotatedIndex = 
    				angle == 90 ? (height - i - 1) + j * height : 
    				(angle == 270 ? i + height * (width - j - 1) : 
    					width * height - (i * width + j) - 1
    				);
     
    			rotatedData[rotatedIndex] = rowData[j];
    		}
    	}
     
    	if(angle == 90 || angle == 270)
    	{
    		return Image.createRGBImage(rotatedData, height, width, true);
    	}
    	else
    	{
    		return Image.createRGBImage(rotatedData, width, height, true);
    	}
    }

    So, how can you use it? Nothing more than:

    Image original = Image.createImage("/original_image.png");
     
    Image rotated_image = rotateImage(original, 90);
     
  • pit 4:06 pm on May 16, 2008 Permalink | Reply
    Tags: , , date field, date item, date picker, ,   

    A J2ME Calendar for all your Canvas! 

    You know that J2ME support for Canvas is quite ridiculous.. One list, some form items, and stop. Canvas is left to its terrible destiny, with nothing more than a couple of lines and circles.. isn’t it sad?
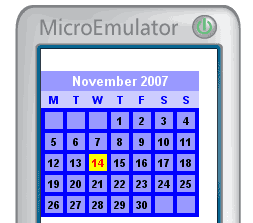
    So, after this melodramatic introduction, we’re ready for today’s code: a fully featured, customizable, Canvas based calendar!

    J2me Canvas Date Picker screenshot

    If you prefer a live demonstration rather than a simple screenshot, just go here: Canvas Calendar in action.

    So, how to use it?

    1. Download its source code (CalendarWidget.java) and put it straight in your project
    2. Instantiate it within your Canvas with its plain-old-unique constructor:
      CalendarWidget calendar = new CalendarWidget(new Date());
    3. Customize it with the colors/fonts/padding you prefer:
      calendar.headerFont = Font.getFont(Font.FACE_PROPORTIONAL, Font.STYLE_BOLD, Font.SIZE_LARGE);
      calendar.weekdayFont = Font.getFont(Font.FACE_PROPORTIONAL, Font.STYLE_BOLD, Font.SIZE_MEDIUM);
      calendar.weekdayBgColor = 0xccccff;
      calendar.weekdayColor = 0x0000ff;
      calendar.headerColor = 0xffffff;
    4. After you’ve customized it, remember to always call its initialize() method:
      calendar.initialize();
    5. Now, to paint it, you can simply call its paint() method from your Canvas paint(), like this:
      protected void paint(Graphics g)
      {
          g.setColor(0xffffff);
          g.fillRect(0, 0, getWidth(), getHeight());
          calendar.paint(g);
      }
    6. Now you must allow users to interact with it, so you can, for example, use Canvas keyPressed() method to interact with calendar:
      protected void keyPressed(int key)
      {
          int keyCode = getGameAction(key);
          if(keyCode == FIRE)
          {
              Display.getDisplay(midlet).setCurrent(
                  new Alert("Selected date", calendar.getSelectedDate().toString(), null, AlertType.CONFIRMATION)
              );
          }
          else
          {
              calendar.keyPressed(keyCode);
              repaint();
          }
      }

      As you see, what we do is this:

      • if the user press FIRE button, we alert the current selected date
      • otherwise we call calendar keyPressed() method, to make it behave accordingly
    7. Other customizable properties include:
      • MONTH_LABELS: change this to customize month labels in your own language
      • WEEKDAY_LABELS: as above, change this to customize weekday labels
      • startWeekday: this represents the week starting day, and its values range goes from 0 (for Monday) to 6 (for Sunday)

    You can download source code of the example described above here: CalendarCanvas.java.

    To get some more details about CalendarWidget source code, you can take a look at my article on Forum Nokia Wiki: Building a J2ME Canvas based Calendar / Date picker.

     
    • rachelwiz 1:19 pm on September 23, 2009 Permalink

      Hi,

      I created a midlet program and tried to compile this Calendar picker application, it gave me the following errors –

      C:\WTK23\apps\CalendarMidlet\src\CalendarWidget.java:79: cannot find symbol
      symbol : method ceil(double)
      location: class java.lang.Math
      this.weeks = (int)Math.ceil(((double)getStartWeekday() + getMonthDays()) / 7);
      ^
      C:\WTK23\apps\CalendarMidlet\src\CalendarWidget.java:79: inconvertible types
      found : java.lang.Math.ceil
      required: int
      this.weeks = (int)Math.ceil(((double)getStartWeekday() + getMonthDays()) / 7);
      ^
      2 errors
      com.sun.kvem.ktools.ExecutionException
      Build failed

      I also added “import java.lang.Math;” this line in my code but still its throwing the same error.

      what may be the problem? Can you please help me in this.

    • Manolo 7:47 am on January 15, 2010 Permalink

      Can i do that on Android, anyone can share some codes.

    • raj 8:28 am on October 14, 2010 Permalink

      than q. this is very use full

    • panthibo 9:05 pm on April 24, 2011 Permalink

      If you have errors with Math.ceil, try this:
      replace
      this.weeks = (int)Math.ceil(((double)getStartWeekday() + getMonthDays()) / 7);
      by:
      this.weeks = (int)(0.9 + ((double)getStartWeekday() + getMonthDays()) / 7);

      It’s working

    • Rajesh 2:40 pm on May 24, 2011 Permalink

      Hi
      The Above Appllication runs fine in midlet but when we creat a JAD File it throws Exception
      Try This using JAD File

  • pit 10:48 am on May 15, 2008 Permalink | Reply
    Tags: , , , , xml parsing   

    How to parse a generic XML file in J2ME with kXML 

    Some days ago I’ve posted J2ME code to parse RSS feeds using kXML library. Today’s code is about parsing a generic XML, so you can use it to parse any XML document you want. Code is splitted in the following two classes.

    XmlNode class

    This is the class representing a single node. We’ll define 2 node types:

    • Text nodes: nodes without a name, contanining only a textual value. For them we’ll define a TEXT_NODE final variable
    • Element nodes: nodes with a tag name, that can have children nodes and/or attributes

    XmlNode class source code is available here: XmlNode.java

    GenericXmlParser class

    This is the class that will actually do XML parsing. We’ll define only one public method, parseXML(), that will accept 2 arguments:

    • a KXmlParser instance, that will be used to do XML parsing
    • a boolean that will tell if whitespace-only text nodes must be ignored or not

    and will return and XmlNode representing the root node of the parsed XML tree.

    GenericXmlParser class source code is available here: GenericXmlParser.java

    Sample usage

    Let’s see how we can use the two classes above. First we must instantiate and initialize a KXmlParser, and then we can call our GenericXmlParser parseXML() method.

    InputStreamReader reader = new InputStreamReader(getClass().getResourceAsStream("/test3.xml"));
     
    KXmlParser parser = new KXmlParser();
     
    parser.setInput(reader);
     
    GenericXmlParser gParser = new GenericXmlParser();
     
    XmlNode xml = gParser.parseXML(parser, true);

    Now, we have our resulting XmlNode that will hold the whole XML tree. We can make a simple dump of it to check if it’s all ok, using this test function:

    void dumpXML(XmlNode node, int deep)
    {
    	for(int i = 0; i < deep; i++)
    	{
    		System.out.print(" ");
    	}
    	System.out.print(node.nodeName + " - ");
     
    	if(node.nodeValue != null)
    	{
    		System.out.print("(" + node.nodeValue + ") - ");
    	}
    	String[] attributes = node.getAttributeNames();
     
    	for(int i = 0; i < attributes.length; i++)
    	{
    		System.out.print(attributes[i] + ": " + node.getAttribute(attributes[i]) + ", ");
    	}
     
    	System.out.println();
     
    	for(int i = 0; i < node.children.size(); i++)
    	{
    		dumpXML((XmlNode)node.children.elementAt(i), deep + 1);
    	}
    }

    Note: This article is available also on Forum Nokia Wiki: How to parse an XML file in J2ME with kXML

     
c
compose new post
j
next post/next comment
k
previous post/previous comment
r
reply
e
edit
o
show/hide comments
t
go to top
l
go to login
h
show/hide help
shift + esc
cancel