Updates from December, 2008 Toggle Comment Threads | Keyboard Shortcuts

  • pit 10:57 am on December 4, 2008 Permalink | Reply
    Tags: animated gif encoder, gif encoder, , ,   

    J2ME Animated GIF encoder 

    Here’s a free implementation of an animated GIF encoder for Java ME. This class is actually a porting of the original Java version, available here.

    Download J2ME AnimatedGifEncoder here.

    Usage is quite straightforward, and it requires these steps:

    1. Instantiate your AnimatedGifEncoder object
    2. Start it, by passing an OutputStream as argument (e.g.: a ByteArrayOutputStream)
    3. Add your Image objects by using addFrame() method
    4. Finalize it by calling finish()
    ByteArrayOutputStream bos = new ByteArrayOutputStream();
     
    AnimatedGifEncoder encoder = new AnimatedGifEncoder();
    encoder.start(bos);
    encoder.addFrame(image1);
    encoder.addFrame(image2);
    encoder.finish();
     
    return bos.toByteArray();

    As for the original version, code is free for any kind of usages, but you must refer to the Unisys LZW patent for restrictions on use of the associated LZWEncoder class.

     
    • ds 7:55 am on December 11, 2008 Permalink

      Thanks! Very useful!

      Have just given it a go and it works like a charm.
      The only thing is I seem to be able to get much smaller images when I save from photoshop.

      Have you any idea if the LZW compression is working properly? The file size I am getting now is just a tad bit smaller in bytes than I have total pixels. On the other hand photoshop, or php for that matter reduces this to 1/5.

      Thanks again!

    • Sajid 10:44 am on August 12, 2011 Permalink

      Hey hi, How to use this J2ME Animated GIF encoder in J2ME Application, please tel me.
      Thanks

  • pit 3:02 pm on October 8, 2008 Permalink | Reply
    Tags: , , , ringtones, , ,   

    Create your first Flash Lite ringtone with KuneriLite 

    For those of you who missed it (really??) latest KuneriLite versions have added support for Flash Lite ringtones, one of the coolest FlashLite features around!!

    Today, we’ll see how it is simple to create a FlashLite ringtone with caller-id support and an application that allows users to easily set and unset it.

    Step 1: The FlashLite ringtone

    To start, we’ll build a really simple FlashLite ringtone.

    Let’s start building a simple interface, with these elements:
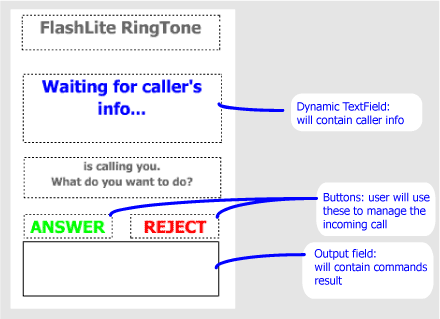
    Now it’s time to add some ActionScript to our interface. So, let’s open frame 1 of our Actions layer.

    Important note: when using KuneriLite from a ringtone SWF, you MUST use port 2001.

    First, we’ll define a method to retrieve caller infos, and display it, depending on the returned data:

    var loader:LoadVars = new LoadVars();
     
    getCallerName();
     
    function getCallerName()
    {
    	commandOutput.text = "Getting caller's info... ";
     
    	loader.onLoad = callerNameHandler;
     
    	loader.load("http://127.0.0.1:2001/Basic/ring?klCommand=callerid");
    }
    function callerNameHandler()
    {
    	commandOutput.text += this.toString();
     
    	if(this.klError != 0)
    	{
    		callerName.text = "Command error: " + this.klError;
    	}
    	else if(this.klName != undefined)
    	{
    		callerName.text = this.klName;
    	}
    	else
    	{
    		callerName.text = this.klNumber;
    	}
    }

    And then, let’s add the call answer/reject functionality to our ringtone. Two other KuneriLite calls will do the job (note that we’ll reuse the LoadVars instance defined above):

    answer.onPress = function()
    {
    	commandOutput.text = "Answering call... ";
     
    	loader.onLoad = callCommandHandler;
     
    	loader.load("http://127.0.0.1:2001/Basic/ring?klCommand=answercall");
    }
    reject.onPress = function()
    {
    	commandOutput.text = "Rejecting call... ";
     
    	loader.onLoad = callCommandHandler;
     
    	loader.load("http://127.0.0.1:2001/Basic/ring?klCommand=hangupcall");
    }
    function callCommandHandler()
    {
    	commandOutput.text += this.toString();
    }

    Important note: since KuneriLite ringtone plugin already handles device answer and reject keys (the green and red one) you could avoid implementing your custom buttons in ringtone SWF (thanks Jukka for the reminder!)

    Step 2: Setting and unsetting the ringtone

    Now, it’s time to build the “main” SWF application, that is the one that the user would launch from phone menu to manage its FlashLite ringtones.

    As usual, let’s create a basic interface, with this layout:
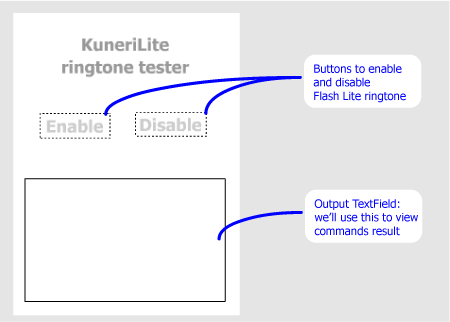
    Now, let’s add the necessary ActionScript code to our Buttons.
    This is for the enable button:

    enableButton.onPress = function()
    {
    	commandOutput.text = "Enabling ringtone..";
     
    	var loader:LoadVars = new LoadVars();
     
    	loader.onLoad = handleResponse;
     
    	loader.load("http://127.0.0.1:1001/Basic/ring?klCommand=enableringswf&klPath=ringtone.swf");
    }

    And similarly, this is for the disable button:

    disableButton.onPress = function()
    {
    	commandOutput.text = "Disabling ringtone..";
     
    	var loader:LoadVars = new LoadVars();
     
    	loader.onLoad = handleResponse;
     
    	loader.load("http://127.0.0.1:1001/Basic/ring?klCommand=disableringswf&klPath=ringtone.swf");
    }

    And here’s the handler, used by both commands calls, to print out the KuneriLite response error code:

    function handleResponse()
    {
    	commandOutput.text += " Error code: " + this.klError;
    }

    Step 3: building and testing

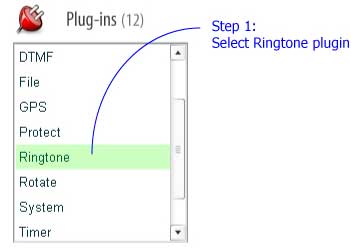
    Building a KuneriLite app is easy as always, but you need to follow these 4 specific steps to make the ringtone correctly work:

    1. Select Ringtone plugin
    2. Place your ringtone SWF in a separate folder, containing only that SWF, and then select it on Wizard Step 2
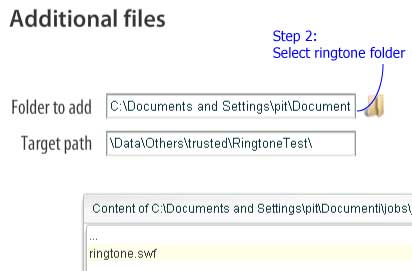
    3. Select the ringtone setter as main SWF
    4. Since Ringtone plugin needs signing, on Step 3 fill in the certificate infos

    Once done, just compile and transfer your SIS on your phone, install and launch it:

    • on main app screen, click the enable button
    • check the command output, to see if the command executed successfully: you should see this message
      Enabling ringtone... Error code: 0
    • if yes, just close the app and call your own phone, and your FlashLite ringtone will magically appear!
    • within the ringtone SWF you will see the caller’s name (if available on your phonebook), otherwise its phone number
    • to answer or reject the incoming call, simply use the buttons we previously placed on stage

    That’s it!

    Conclusions

    Now, add this with the other KuneriLite features, and you could end up having:

    • browsable ringtones catalogs, directly downloadable from your FlashLite app
    • ringones for specific contacts (a phonebook plugin would be great!)
    • location-based ringones!

    Isn’t this enough?

     
    • José Xavier 6:14 pm on October 8, 2008 Permalink

      Hi,
      Can i translate your tutorial to portuguese to post in my blog and ofcourse i’ll say that tutorial is yours… sorry my english.
      :)

    • Jukka 11:07 am on October 9, 2008 Permalink

      Hi Alessandro,
      awesome tutorial as usual :)

      One comment: Handling answer and reject buttons in Flash Lite is actually unnecessary, since KuneriLite ringtone plugin handles the ‘green’ and ‘red’ dialkeys.
      They are naturally used when answering a call ;)

    • pit 11:42 am on October 9, 2008 Permalink

      Hi all!

      @José: sure, feel free to translate it to portuguese!

      @Jukka: thanks for the reminder! I’ve added this info to the article :)

  • pit 9:33 am on October 6, 2008 Permalink | Reply
    Tags: , , , , s60 5th edition, , touch scrolling, touch ui   

    Touch and J2ME part 1: how scroll an image 

    When you start writing your first app for the new S60 5th edition platform you’ll find that, among the first things to deal with, there is interface scrolling: when playing with touchscreen devices, users expect to be able to interact with on-screen objects by simple stylus/finger gestures, rather than by an old-fashion, on-screen keyboard.

    Today, we’ll see how to implement touch scrolling in Java ME in a simple scenario: scrolling a large Image, that doesn’t fit on the device display.

    A sample MIDlet showing this code in action is available on the emulator page: Touch scrollable image in action.

    Source Code: ScrollableImageCanvas class

    Let’s start defining the main class, that will extend the Canvas object:

    public class ScrollableImageCanvas extends Canvas
    {
    {

    Now, we define properties that we’ll use to manage:

    • image size
    • image translation
    • user touch interaction
    // image-related properties
    int imageHeight = 0;
    int imageWidth = 0;
    Image image = null;
    // scroll properties
    protected int translationX = 0;
    protected int translationY = 0;
     
    // touch properties
    protected int lastPointerX = -1;
    protected int lastPointerY = -1;

    Class constructor is quite straightforward, and only needs an Image as argument:

    public ScrollableImageCanvas(Image image)
    {
    	this.image = image;
    	this.imageWidth = image.getWidth();
    	this.imageHeight = image.getHeight();
    }

    Also paint() implementation is simple, since it simply draws the given Image at current translation x and y coordinates:

    protected void paint(Graphics g)
    {
    	g.setColor(0xffffff);
    	g.fillRect(0, 0, getWidth(), getHeight());
    	g.drawImage(image, - translationX, - translationY, Graphics.TOP | Graphics.LEFT);
    }

    Finally, we must implement the touch-based scrolling functionality. To do this, we’ll override the 3 pointer handlers provided by Canvas objects:

    • pointerPressed: called when the pointer is pressed
    • pointerReleased: called when the pointer is released
    • pointerDragged: called when the pointer is dragged
    protected void pointerPressed(int x, int y)
    {
    	lastPointerX = x;
    	lastPointerY = y;
    }
    protected void pointerReleased(int x, int y)
    {
    	lastPointerX = -1;
    	lastPointerY = -1;
    }
    protected void pointerDragged(int x, int y)
    {
    	scrollImage(lastPointerX - x, lastPointerY - y);
    	lastPointerX = x;
    	lastPointerY = y;
    }

    The scrollImage() method implementation follows. What it does is:

    • increment the current translation x and y coordinated by the given x and y deltas
    • normalize the new translation x and y coordinates, so that Image will not go out of bounds
    void scrollImage(int deltaX, int deltaY)
    {
    	if(imageWidth > getWidth())
    	{
    		translationX += deltaX;
    		if(translationX < 0)
    			translationX = 0;
    		else if(translationX + getWidth() > imageWidth)
    			translationX = imageWidth - getWidth();
    	}
     
    	if(imageHeight > getHeight())
    	{
    		translationY += deltaY;
     
    		if(translationY < 0)
    			translationY = 0;
    		else if(translationY + getHeight() > imageHeight)
    			translationY = imageHeight - getHeight();
    	}
     
    	repaint();
    }

    Complete class source code is available here: ScrollableImageCanvas.java.

    If you like this article, feel free to rate it on Forum Nokia Wiki.

    Further development

    A lot of improvements can be done to the code presented in this article. Just some examples are:

    • scrollbars: a fundamental element to let the user know how much he can scroll both in vertical and horizontal directions
    • smooth scrolling: using some inertia when applying scrolling movement will make the whole scrolling effect a lot more realistic
     
    • truf 11:44 am on October 7, 2008 Permalink

      Looking forward for part 2.

    • Bhaskar Nag 8:51 am on November 5, 2008 Permalink

      Your site is very strong in contents of j2me.I got my required codes in j2me from your site.please send me lots of j2me (mobile application code) in my mentioned emailid bellow,I would be highly obliged.
      bhaskar.nag@rediffmail.com
      Thanking You.
      Your’s truely.
      Bhaskar Nag.

    • kamil inal 1:54 pm on November 6, 2009 Permalink

      Thanks for this article:)

    • ankush 9:00 am on April 16, 2011 Permalink

      thanx a lot .. :D

    • abah 1:40 pm on September 16, 2011 Permalink

      thanks! it helps me! :D

  • pit 3:09 pm on September 15, 2008 Permalink | Reply
    Tags: , , , menu, menu transition, sliding menu,   

    Building a J2ME sliding menu with text and images 

    Whatever you’re building, a game or an application, you always need a menu to let users navigate through sections of your MIDlet.

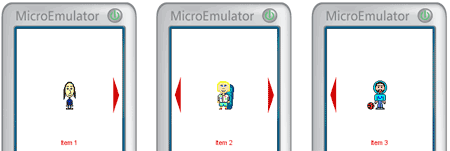
    This article will show how to build a menu with text and icons, and with a nice sliding effect to go from one menu item to another. You can see the final effect on the emulator page: J2ME Sliding Menu in action.

    Source code: SlideIconsMenu class

    As always, let’s start defining our class:

    public class SlideIconsMenu
    {
    }

    Now, we define some appearance-related properties, that can be customized to change menu colors and font.

    // selected item index
    public int selectedIndex = 0;
     
    // icon label color
    public int textColor = 0xff0000;
     
    // menu bg color
    public int bgColor = 0xffffff;
     
    // icon label font
    public Font textFont = Font.getDefaultFont();
     
    // menu right and left Images
    public Image slideRightImage = null;
    public Image slideLeftImage = null;

    And some other properties, that will be internally used by the menu class itself, to handle content and the sliding animation:

    // menu size
    int width = 0;
    int height = 0;
     
    // item labels
    String[] labels = null;
    // item icons
    Image[] icons = null;
     
    // previous item index (during menu translation)
    int prevIndex = 0;
     
    // menu sliding translation properties
    public int translationDuration = 500;
    long startTranslationTime = 0;

    Now, let’s define the menu constructor. We need a constructor that will accept these arguments:

    • a set of item labels
    • a set of images, one for each item
    • the menu width
    • and the menu height
    public SlideIconsMenu(String[] labels, Image[] icons, int width, int height) throws Exception
    {
    	this.width = width;
    	this.height = height;
     
    	this.labels = labels;
    	this.icons = icons;
     
    	slideRightImage = Image.createImage("/slide_right.png");
    	slideLeftImage = Image.createImage("/slide_left.png");
    }

    The constructor also creates 2 Images to represent the left and right sliding arrows, that will be used to indicate more items on the menu left/right side. So, in your code, you must adapt those image paths to match existing ones within your project.

    Now we must handle item change, by letting our menu slide with a nice transition. To do this, we’ll manage the item change with the following slideItem() method:

    public void slideItem(int delta)
    {
    	if(!isTranslating() && selectedIndex + delta >= 0 && selectedIndex + delta < labels.length)
    	{
    		prevIndex = selectedIndex;
     
    		selectedIndex += delta;
     
    		startTranslationTime = System.currentTimeMillis();
    	}
    }
    public boolean isTranslating()
    {
    	return prevIndex != selectedIndex;
    }

    And finally, since we need to paint our menu, here is its paint() method:

    public void paint(Graphics g)
    {
    	g.setColor(bgColor);
    	g.fillRect(0, 0, width, height);
     
    	g.setColor(textColor);
     
    	if(selectedIndex > 0)
    	{
    		g.drawImage(slideLeftImage, 2, height / 2, Graphics.LEFT | Graphics.VCENTER);
    	}
    	if(selectedIndex < icons.length - 1)
    	{
    		g.drawImage(slideRightImage, width - 2, height / 2, Graphics.RIGHT | Graphics.VCENTER);
    	}
    	g.drawString(labels[selectedIndex], width / 2, height - 2, Graphics.BOTTOM | Graphics.HCENTER);
     
    	g.setClip(slideLeftImage.getWidth(), 0, width - 2 * slideLeftImage.getWidth(), height);
     
    	if(selectedIndex != prevIndex)
    	{
    		int diff = (int)(System.currentTimeMillis() - startTranslationTime);
     
    		if(diff > translationDuration)
    		{
    			diff = translationDuration;
    		}
     
    		int coeff = selectedIndex > prevIndex ? 1 : - 1;
    		int currentX = width / 2 - coeff * diff * width / translationDuration;
    		int nextX = currentX + width * coeff;
     
    		g.drawImage(icons[prevIndex], currentX, height / 2, Graphics.VCENTER | Graphics.HCENTER);
     
    		g.drawImage(icons[selectedIndex], nextX, height / 2, Graphics.VCENTER | Graphics.HCENTER);
     
    		if(diff >= translationDuration)
    		{
    			prevIndex = selectedIndex;
    		}
    	}
    	else
    	{
    		g.drawImage(icons[selectedIndex], width / 2, height / 2, Graphics.VCENTER | Graphics.HCENTER);
    	}
    }

    Sample usage

    Here’s a sample Canvas that uses the SlideIconsMenu class. The main steps are:

    • the menu constructions
    • the key handling, done within the Canvas keyPressed() method
    • the menu repainting, done periodically, to allow the sliding transition to be smoothly drawn
    import javax.microedition.lcdui.Canvas;
    import javax.microedition.lcdui.Graphics;
    import javax.microedition.lcdui.Image;
     
    public class SlideIconsCanvas extends Canvas implements Runnable
    {
    	SlideIconsMenu menu = null;
     
    	public SlideIconsCanvas()
    	{
    		Image[] im = new Image[3]; 
     
    		try
    		{
    			im[0] = Image.createImage("/item0.png");
    			im[1] = Image.createImage("/item1.png");
    			im[2] = Image.createImage("/item2.png");
     
    			menu = new SlideIconsMenu(
    				new String[]{"Item 1", "Item 2", "Item 3"},
    				im,
    				getWidth(),
    				getHeight()
    			);
     
    			new Thread(this).start();
    		}
    		catch(Exception e)
    		{
    			e.printStackTrace();
    		}
    	}
    	protected void paint(Graphics g)
    	{
    		menu.paint(g);
    	}
    	public void keyPressed(int key)
    	{
    		int gameKey = getGameAction(key);
     
    		if(gameKey == Canvas.RIGHT)
    		{
    			menu.slideItem(1);
    		}
    		else if(gameKey == Canvas.LEFT)
    		{
    			menu.slideItem(- 1);
    		}
    	}
    	public void run()
    	{
    		try
    		{
    			while(true)
    			{
    				repaint();
     
    				synchronized(this)
    				{
    					wait(100L);
    				}
    			}
    		}
    		catch(Exception e)
    		{
    			e.printStackTrace();
    		}
    	}
     
    }

    Download source code

    You can download full source code here:

     
    • deanet 7:21 pm on September 24, 2008 Permalink

      wew … nice code :mrgreen:

    • Stella 8:26 am on October 1, 2008 Permalink

      Hi ,
      this screen is brilliant, i was wondering if you could come up with a design that is similar to the carousel interface of yahoo GO!. this design is quite close to that

      byeeeee ;)
      Stella

    • pit 9:04 am on October 1, 2008 Permalink

      Thanks for your feedback :)

      @stella: check out this other article, if it could suit your needs
      http://www.jappit.com/blog/2008/04/24/building-a-fisheye-menu-in-j2me-with-jsr-226/

    • Stella 7:04 am on October 15, 2008 Permalink

      yep i seen that. but that uses JSR226 right :( what about devices that dont have JSR266

      Regards
      Stella

    • Tyler 1:22 pm on April 30, 2009 Permalink

      Hi jappit;
      i have look at your code but i think you always refresh screen and wait 100ms. right? It uses 100% processor.

    • jermaine 3:23 am on September 29, 2010 Permalink

      thanks for this bit of code…but uhm, how do i run this? i copied the source codes but i dont know where to place the jar files…

  • pit 8:44 am on September 12, 2008 Permalink | Reply
    Tags: , , , , list, ,   

    How to build a Canvas based List in J2ME 

    Quite a bit of time is passed since the last Java ME tutorial.. so It’s time for something new, don’t you think?

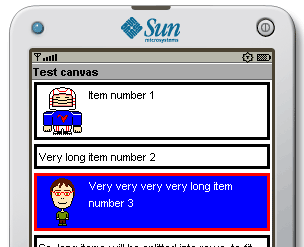
    Today we’ll see how it is possible to implement a simple Canvas based List, with the following features:

    • customizable style (colors, margins, font)
    • vertical scrolling
    • image and text support (as for standard Java ME Lists)

    Java ME Canvas based List screenshot

    It is possible to see this code in action on the emulator page.

    Writing the code

    First thing you should define some style-related properties, that will be used to paint the List items. Name of single properties is self-explaining.

    int linePadding = 2;
    int margin = 2;
    int padding = 2;
    Font font = Font.getDefaultFont();
     
    int bgColor = 0xffffff;
     
    int foreColor = 0x000000;
    int foreSelectedColor = 0xffffff;
    int backColor = 0xffffff;
    int backSelectedColor = 0x0000ff;
     
    int borderWidth = 3;
    int borderColor = 0x000000;
    int borderSelectedColor = 0xff0000;

    Now, here are some internal properties, that will be used to handle list items content and positioning.

    // will contain item splitted lines
    String[][] itemLines = null;
    // will hold items image parts
    Image[] images = null;
    // will hold selected item index
    public int selectedItem = 0;
     
    // these will hold item graphical properties
    int[] itemsTop = null;
    int[] itemsHeight = null;
     
    // these will hold List vertical scrolling
    int scrollTop = 0;
    final int SCROLL_STEP = 40;

    Now, here is the CanvasList constructor. Its arguments are (similarly to javax.microedition.lcdui.List constructor):

    • the screen’s title
    • set of strings specifying the string parts of the List elements
    • set of images specifying the image parts of the List elements

    This article will not cover the handling of different types of Lists (e.g.: exclusive, multiple, ..).

    public CanvasList(String title, String[] items, Image[] imageElements)
    {
    	setTitle(title);
     
    	this.images = imageElements;
     
    	itemLines = new String[items.length][];
     
    	itemsTop = new int[itemLines.length];
    	itemsHeight = new int[itemLines.length];
     
    	for(int i = 0; i < itemLines.length; i++)
    	{
    		// get image part of this item, if available
    		Image imagePart = getImage(i);
     
    		// get avaiable width for text
    		int w = getItemWidth() - (imagePart != null ? imagePart.getWidth() + padding : 0);
     
    		// and split item text into text rows, to fit available width
    		itemLines[i] = getTextRows((String) items[i], font, w);
    	}
    }

    Here are the 2 utility methods found in the CanvasList constructor:

    public int getItemWidth()
    {
    	return getWidth() - 2 * borderWidth - 2 * padding - 2 * margin;
    }
    Image getImage(int index)
    {
    	return images != null && images.length > index ? images[index] : null;
    }

    Now, here is the paint() method:

    protected void paint(Graphics g)
    {
    	// paint List background
    	g.setColor(bgColor);
    	g.fillRect(0, 0, getWidth(), getHeight());
     
    	// translate accordingly to current List vertical scroll
    	g.translate(0, - scrollTop);
     
    	int top = 0;
     
    	g.setFont(font);
     
    	// loop List items
    	for(int i = 0; i < itemLines.length; i++)
    	{
    		int itemRows = itemLines[i].length;
     
    		Image imagePart = getImage(i);
     
    		int itemHeight = itemRows * font.getHeight() + linePadding * (itemRows - 1);
     
    		itemsTop[i] = top;
    		itemsHeight[i] = itemHeight;
     
    		// is image part higher than the text part?
    		if(imagePart != null && imagePart.getHeight() > itemHeight)
    		{
    			itemHeight = imagePart.getHeight();
    		}
    		itemHeight += 2 * padding + 2 * borderWidth;
     
    		g.translate(0, top);
     
    		if(borderWidth > 0)
    		{
    			// paint item border
    			g.setColor(i == selectedItem ? borderSelectedColor : borderColor);
    			g.fillRect(margin, margin, getWidth() - 2 * margin, itemHeight);
    		}
     
    		// paint item background
    		g.setColor(i == selectedItem ? backSelectedColor : backColor);
    		g.fillRect(margin + borderWidth, margin + borderWidth, getWidth() - 2 * margin - 2 * borderWidth, itemHeight - 2 * borderWidth);
     
    		// has this item an image part?
    		if(imagePart != null)
    		{
    			g.drawImage(imagePart, margin + borderWidth + padding, margin + borderWidth + padding, Graphics.TOP | Graphics.LEFT);
    		}
     
    		// paint item text rows
    		g.setColor(i == selectedItem ? foreSelectedColor : foreColor);
     
    		int textLeft = margin + borderWidth + padding + (imagePart != null ? imagePart.getWidth() + padding : 0);
     
    		for(int j = 0; j < itemRows; j++)
    		{
    			g.drawString(itemLines[i][j], textLeft, margin + borderWidth + padding + j * (linePadding + font.getHeight()), Graphics.TOP | Graphics.LEFT);
    		}
     
    		g.translate(0, - top);
     
    		top += itemHeight + 2 * margin;
    	}
    	// finally, translate back
    	g.translate(0, scrollTop);
    }

    And finally, to handle user key events, here is the keyPressed() event:

    protected void keyPressed(int key)
    {
    	int keyCode = getGameAction(key);
     
    	// is there 1 item at least?
    	if(itemLines.length > 0)
    	{
    		// going up
    		if(keyCode == Canvas.UP)
    		{
    			// current item is clipped on top, so can scroll up
    			if(itemsTop[selectedItem] < scrollTop)
    			{
    				scrollTop -= SCROLL_STEP;
     
    				repaint();
    			}
    			// is there a previous item?
    			else if(selectedItem > 0)
    			{
    				selectedItem--;
     
    				repaint();
    			}
    		}
    		//going down
    		else if(keyCode == Canvas.DOWN)
    		{
    			// current item is clipped on bottom, so can scroll down
    			if(itemsTop[selectedItem] + itemsHeight[selectedItem] >= scrollTop + getHeight())
    			{
    				scrollTop += SCROLL_STEP;
     
    				repaint();
    			}
    			// is there a following item?
    			else if(selectedItem < itemLines.length - 1)
    			{
    				selectedItem++;
     
    				repaint();
    			}
    		}
    	}
    }

    About the getTextRows() method, you can grab an implementation (but you could find a lot of other ones on the Web) on this other article written some time ago: J2ME Scrollable Text.

    How to use CanvasList class

    Here is a sample usage of CanvasList class, that will display a list (without image parts):

    String[] items = new String[]{"Item 1", "Item 2", "Item 3"};
     
    CanvasList myCanvas = new CanvasList("Test canvas", items, null);

    To add images to your items, it’s necessary to instantiate an Image array, and pass it to CanvasList constructor as its third argument:

    Image[] images = null;
    try
    {
    	images = new Image[]{
    		Image.createImage("/item1.png"),
    		Image.createImage("/item2.png"),
    		Image.createImage("/item3.png")
    	};
    }
    catch(Exception e)
    {
    	e.printStackTrace();
    }
    String[] items = new String[]{"Item 1", "Item 2", "Item 3"};
     
    CanvasList myCanvas = new CanvasList("Test canvas", items, images);

    Related resources

    You can download full CanvasList source code here: CanvasList.java

     
    • cool8jay 9:19 am on June 24, 2010 Permalink

      Very good tutorial about scrollable list view, it meets my demand. But the getTextRows() method has some shortcoming: it does not support language not using space as delimiter, like Chinese and Japanese.

      Here is a more flexible version:
      http://dev.firnow.com/course/3_program/java/javajs/20090304/157622.html#comment

    • ketut joko 2:04 pm on July 7, 2011 Permalink

      when i add this file class my main class cant detect, can u explain it please?

    • pooja 12:48 pm on January 16, 2013 Permalink

      Thanks. Nice post.

      But I am phasing the problem in converting the same for touch. As we need to give touch scrolling on the list. This post is for keypress events. can you please provide the same with touch scrolling.

  • pit 9:45 am on September 10, 2008 Permalink | Reply
    Tags: alessandro pace, , croozeus, felipe andrade, , forum nokia widget contribution competition, , janus, , , kunerilite tutorial, , pasi manninen, project capuchin, pys60   

    Back to work with: Capuchin, Jarpa, Widgets, KuneriLite, Janus, Croozeus.. just to start! 

    I’m finally back to work after some holidays (from some days already… but first work days right after holidays are always full of tasks, don’t you think?)

    Anyway, I came back just in time to find a lot of cool news!

    Jappit

    First of all, the database of this blog was not working anymore, and so, if someone of you has tried to post comments, would have most probably failed. Anyway, after a night of passion, it is newly working like a charm!

    For those of you who missed it (ahem…) Adobe held an interesting eSeminar about Project Capuchin, and the recording is available here: Project Capuchin Adobe eSeminar.

    Meanwhile, Felipe Andrade released an LBS enabled MIDlet that makes use of Jarpa to allow Java ME and Flash Lite to intercommunicate.

    On Forum Nokia, the Wiki was revamped with a new homepage layout, and with some cool introductions. One of them is the Featured Articles section, that will highlight an interesting Wiki article each week. And with great pleasure I noticed that 2 articles I’ve written were featured in past weeks:

    Also, a new contest was launched, this time regarding Widget Development, and full rules are available here: Forum Nokia Widget Contribution competition.

    You should know that I’m also a great fan of KuneriLite and its team, and so I can not avoid to feature Pasi Manninen tutorial on how to Take, play and send video file from Flash Lite to server: superb!

    Talking about FlashLite and Symbian, Leonardo Risuleo released his Janus Symbian Engine, the custom made extension that will help you improve Flash Lite functionalities, as open source! I definitely think this is great, and that there should be more high-quality open-source projects like this in mobile environment. In this sense, mobile is yet far from web development.

    Also, Croozeus is doing a great work with his website dedicated to S60 Python developers, and he recently completed the first 5 applications (with full source code). Also, if you want to fully understand and learn PyS60, you should not miss out his talks!

    And, latest fresh news, Alessandro Pace (a.k.a. Biskero) was yesterday declared Forum Nokia Chamption of the Month: congratulations goes to him for this award as for its incredible effort and results in the FlashLite community!

    That’s a (really) rapid summary of what I’ve missed on these holidays (but I’ve not missed this one!), and a lot of other things are still around… maybe should I work more? :)

     
    • Coker 3:37 pm on March 8, 2009 Permalink

      Hello,

      Please does Kunerilite work on Series 40 phones? Also what alternatives do we have for Sony Ericsson?

      Thanks

c
compose new post
j
next post/next comment
k
previous post/previous comment
r
reply
e
edit
o
show/hide comments
t
go to top
l
go to login
h
show/hide help
shift + esc
cancel