Building a dynamic fisheye menu in Flash Lite
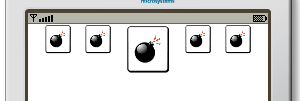
Some time ago, we’ve seen how to build a fisheye menu with J2ME. Now, it’s time to see how to create the same component with Flash Lite.
The FisheyeMenu source code
Step 1. The menu MovieClip and external class
Let’s create the FisheyeMenu ActionScript class, that will extend MovieClip, that will be used to implement the actual menu logic:
class FisheyeMenu extends MovieClip { } |
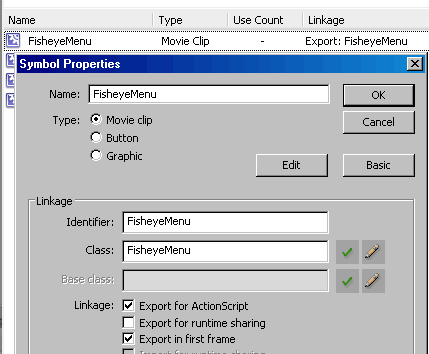
Then, create an empty movie clip in your library, export it, and associate it with the FisheyeMenu class.

Step 2. Initializing the menu
First, define these 4 menu properties, that will hold some useful values:
// focus index of the selected menu item var focusedIndex:Number; // total number of menu items var itemsNum:Number; // width of single menu items (in pixels) var itemWidth:Number; // the MovieClip that will contain the menu items var itemsContainer:MovieClip; |
Let’s also define an utility function that returns the currently focused item index:
public function getFocusedIndex() { return this.focusedIndex; } |
And then, implement a function that will be used to initialize the menu with the items you want.
public function initializeMenu(itemIds:Array, itemWidth:Number) { this.itemsNum = itemIds.length; this.focusedIndex = 0; this.itemWidth = itemWidth; this.initItems(itemIds); } private function initItems(itemIds:Array) { this.itemsContainer = this.createEmptyMovieClip('itemsContainer', this.getNextHighestDepth()); for(var i:Number = 0; i < itemIds.length; i++) { var item:MovieClip = itemsContainer.attachMovie(itemIds[i], 'item_' + i, itemsContainer.getNextHighestDepth(), {_x: itemWidth * i, _y: 0}); if(i > 0) { item._xscale = 50; item._yscale = 50; } } } |
The initializeMenu() function is the function you will call to initialize your fisheye menu with the items you want. Its arguments are:
- an Array containing the id of MovieClip symbols to be used as items
- the width of single menu items
Once called, initializeMenu() initializes the menu properties and then calls the initItems() function, that will actually attach the item instances, scaling down the unselected items and translating the menu itself to its starting position.
The getMenuLeft() function returns the x position to be used for the itemsContainer MovieClip, and depends on the focused item index:
private function getMenuLeft():Number { return - itemWidth * focusedIndex; } |
Step 3. Implement sliding funcionality
When the user presses LEFT and RIGHT keys, you want the menu to perform these steps:
- change the focused item, scaling down the previously focused one, and scaling up the new
- translate the menu to be centered on the new focused item
In ActionScript, you can do it this way:
public function shiftItem(itemDelta:Number) { var nextIndex:Number = focusedIndex + itemDelta; if(nextIndex >= 0 && nextIndex < itemsNum) { scaleItem(focusedIndex, true); focusedIndex = nextIndex; scaleItem(focusedIndex, false); moveMenu(); } } private function moveMenu():Void { new Tween(itemsContainer, "_x", None.easeNone, itemsContainer._x, getMenuLeft(), .50, true); } private function scaleItem(itemIndex:Number, scaleDown:Boolean):Void { var item:MovieClip = itemsContainer['item_' + itemIndex]; var fromScale:Number = scaleDown ? 100 : 50; var toScale:Number = scaleDown ? 50 : 100; new Tween(item, "_xscale", None.easeNone, fromScale, toScale, .50, true); new Tween(item, "_yscale", None.easeNone, fromScale, toScale, .50, true); } |
In this code snippet, there are 3 functions:
- shiftItem() is the function called to change the focused Item index by the passed delta argument. It checks if the change is ok, and then calls the following 2 functions:
- moveMenu() actually translates the items container, to have the new focused item horizontally centered
- scaleItem() scales up or down, depending on the scaleDown argument, the item corresponding at the index passed as argument
Since here we use the Tween class, we have to add these 2 import lines at the beginning of the ActionScript file:
import mx.transitions.Tween; import mx.transitions.easing.*; |
How to use the fisheye-menu
Step 4. Create the menu items symbols
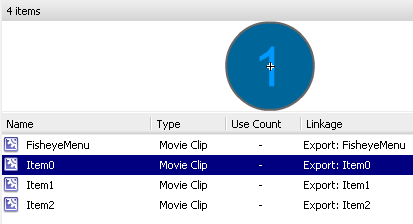
Take back your FLA, and create 3 symbols that will be used as items within the fisheye menu. Also, remember to check the “Export for ActionScript” option, to have them actually usable from ActionScript itself.

Step 5. Attach and initialize the menu
Now, attach a FisheyeMenu istance directly to the _root, and initialize it with the ID of the symbols created in the previous step:
var menu:MovieClip = _root.attachMovie('FisheyeMenu', 'main_menu', _root.getNextHighestDepth()); var items:Array = new Array('Item0', 'Item1', 'Item2'); menu._x = 120; menu._y = 120; menu.initializeMenu(items, 50); |
Step 6. Create a KeyListener to interact with the menu
The KeyListener will be really simple, since it will simply call the shiftItem() function when the user press LEFT or RIGHT keys, and will call a custom function when the user press the ENTER key, to trace the index of the current focused item:
var keyListener:Object = new Object(); keyListener.onKeyDown = function() { var key:Number = Key.getCode(); if(key == Key.RIGHT) { menu.shiftItem(1); } else if(key == Key.LEFT) { menu.shiftItem(-1); } else if(key == Key.ENTER) { menuFireAction(); } } Key.addListener(keyListener); function menuFireAction() { trace("MENU ITEM PRESSED: " + menu.getFocusedIndex()); } |
Downloads and related resources
You can download full source code (FLA + ActionScript file) of this example here:
If you like this article, feel free to vote it on Forum Nokia Wiki.


Li YongFei 9:34 am on February 20, 2009 Permalink
Great tutorial!