Tagged: nokia Toggle Comment Threads | Keyboard Shortcuts

  • pit 12:16 pm on May 26, 2009 Permalink | Reply
    Tags: nokia, ,   

    Nokia Ovi Store launched! 

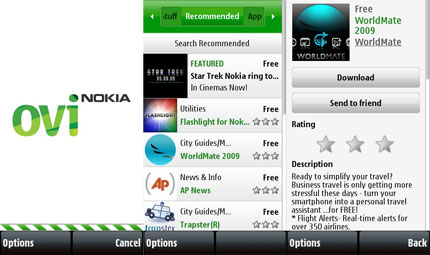
    Nokia has finally launched his Ovi Store!

    Ovi Store by Nokia is now available globally to an estimated 50 million Nokia device owners across more than 50 Nokia devices, including the forthcoming flagship device, the Nokia N97.

    Starting from today, on a first set of Nokia devices, you can start purchasing and downloading applications from the Ovi Store client on your device.

    And, if you’re a developer, you can finally start to distribute your content to all Nokia users around the globe! :)

     
  • pit 10:10 pm on May 19, 2009 Permalink | Reply
    Tags: , nokia, postcards   

    An evening curiosity about Nokia postcards 

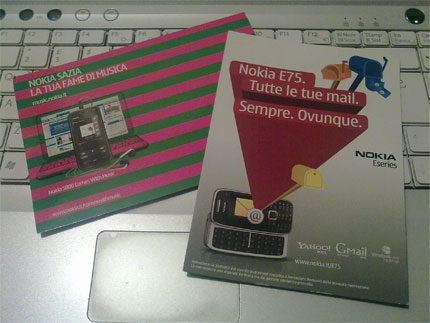
    I’m just back from a nice dinner at an Italian restaurant, L’Instalata Ricca (tipical for its big and creative salads), where I found these nice Nokia postcards:

    Their positioning was not the best possible (they were just in front of the toilet :| ), but what I’m curious about is: are Nokia postcards equal in all countries?

    My guess is yes, being Nokia brand well estabilished and known all around the globe, but if you have some pictures, please post their links.. my evening curiosity will be grateful you :)

     
  • pit 1:16 pm on May 19, 2009 Permalink | Reply
    Tags: , , nokia, , , ,   

    Mobilising websites: guidelines for WRT Widgets development, part 1 

    More and more initiatives are taking place to promote mobile Widgets in various forms. One example is the Calling All Innovators competition by Nokia, that has a category dedicated to “Internet Innovations”, and where you can submit your mobile applications based on Web technologies.

    So, since there are a lot of opportunities to promote yourself and your work, I started thinking and writing some guidelines that could hopefully help both Web and mobile developers to approach Web Runtime widgets development.

    You can read the first part of this guidelines on my blog on Forum Nokia:

    Mobilising websites: guidelines for WRT Widgets development, part 1

    As always, I would be happy to have any kinds of feedbacks about it :)

     
  • pit 12:43 pm on May 5, 2009 Permalink | Reply
    Tags: monaco, montecarlo, nds09, nokia, nokia developer summit 2009   

    Nokia Developer Summit 2009 

    Nokia Developer Summit took place in MonteCarlo, during April 28-29, and all I can say is that it was a GREAT event.

    Two days of talks, keynotes, presentations, meetings and good people from all around the world made of this event a great opportunity to learn about current and future Nokia plans and to share opinions and thoughts with other developers.

    Summarizing all it up, three were the main point on which Nokia is actually focusing:

    • Web Runtime widgets: a great opportunity for both Web and mobile developers to create cool user experiences for mobile phones, by using easy-to-learn technologies (HTML, CSS, JavaScript), and integrating with lower level device functionalities (via Platform Services), and with the opportunity to put content also on device home screen.
    • QT: this will be, hopefully, the framework leveraging Symbian C++ developers from all the chaos that has always ruled this area. QT promises to be a big step toward ease of learning and use. While other strong mobile platforms are emerging, Nokia had really no more time to focus on developers: apart from giving them a powerful and open platform, this is the time to help them to create applications without worrying about the platform itself.
    • OVI: the Nokia application store is finally near its official launch, and Nokia gave the chance to preview it on real devices. Good user experience, on my opinion, but only distribution and real usage will tell how pervasive it can be (what about an Ovi Store home widget?).

    What about the other technologies? Flash Lite is stronger than ever, and if you’re a Flash Lite developer, don’t miss out the many opportunities out there to promote yourself and your apps, as the Open Screen Project, Nokia’s Calling All Innovators and the Flash Lite Developer Challenge.

    What if you’re a Java ME developer: well, nothing new, really. Just the confirmation that mobile ecosystem is rapidly expanding and, if you don’t want to be left behind, you really have to take a look around. There will be always need of Java ME developers, but coolest things, in this moment, are elsewhere (and telling this as a Java ME enthusiast is a bit sad :) ).

    Hackathon

    Apart from the main stream of talks, a tight competition took place among 10 developer teams from all around the globe, that were able to create great looking WRT widgets, from ideas directly coming from consumers, in an incredibly short time. Check out the complete team list here, and congratulate with them all! :)

     
  • pit 3:02 pm on October 8, 2008 Permalink | Reply
    Tags: , , nokia, ringtones, , ,   

    Create your first Flash Lite ringtone with KuneriLite 

    For those of you who missed it (really??) latest KuneriLite versions have added support for Flash Lite ringtones, one of the coolest FlashLite features around!!

    Today, we’ll see how it is simple to create a FlashLite ringtone with caller-id support and an application that allows users to easily set and unset it.

    Step 1: The FlashLite ringtone

    To start, we’ll build a really simple FlashLite ringtone.

    Let’s start building a simple interface, with these elements:
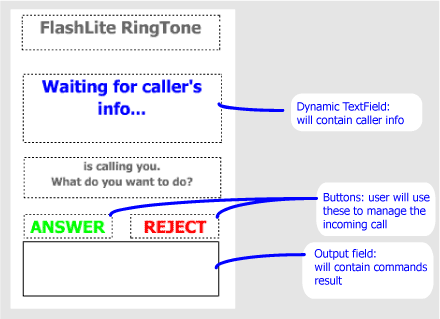
    Now it’s time to add some ActionScript to our interface. So, let’s open frame 1 of our Actions layer.

    Important note: when using KuneriLite from a ringtone SWF, you MUST use port 2001.

    First, we’ll define a method to retrieve caller infos, and display it, depending on the returned data:

    var loader:LoadVars = new LoadVars();
     
    getCallerName();
     
    function getCallerName()
    {
    	commandOutput.text = "Getting caller's info... ";
     
    	loader.onLoad = callerNameHandler;
     
    	loader.load("http://127.0.0.1:2001/Basic/ring?klCommand=callerid");
    }
    function callerNameHandler()
    {
    	commandOutput.text += this.toString();
     
    	if(this.klError != 0)
    	{
    		callerName.text = "Command error: " + this.klError;
    	}
    	else if(this.klName != undefined)
    	{
    		callerName.text = this.klName;
    	}
    	else
    	{
    		callerName.text = this.klNumber;
    	}
    }

    And then, let’s add the call answer/reject functionality to our ringtone. Two other KuneriLite calls will do the job (note that we’ll reuse the LoadVars instance defined above):

    answer.onPress = function()
    {
    	commandOutput.text = "Answering call... ";
     
    	loader.onLoad = callCommandHandler;
     
    	loader.load("http://127.0.0.1:2001/Basic/ring?klCommand=answercall");
    }
    reject.onPress = function()
    {
    	commandOutput.text = "Rejecting call... ";
     
    	loader.onLoad = callCommandHandler;
     
    	loader.load("http://127.0.0.1:2001/Basic/ring?klCommand=hangupcall");
    }
    function callCommandHandler()
    {
    	commandOutput.text += this.toString();
    }

    Important note: since KuneriLite ringtone plugin already handles device answer and reject keys (the green and red one) you could avoid implementing your custom buttons in ringtone SWF (thanks Jukka for the reminder!)

    Step 2: Setting and unsetting the ringtone

    Now, it’s time to build the “main” SWF application, that is the one that the user would launch from phone menu to manage its FlashLite ringtones.

    As usual, let’s create a basic interface, with this layout:
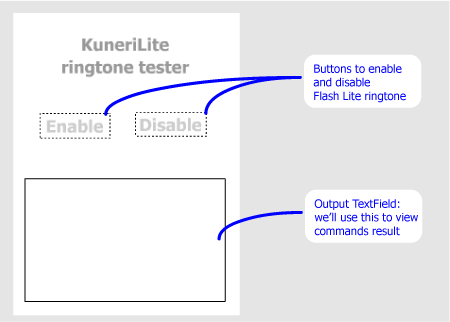
    Now, let’s add the necessary ActionScript code to our Buttons.
    This is for the enable button:

    enableButton.onPress = function()
    {
    	commandOutput.text = "Enabling ringtone..";
     
    	var loader:LoadVars = new LoadVars();
     
    	loader.onLoad = handleResponse;
     
    	loader.load("http://127.0.0.1:1001/Basic/ring?klCommand=enableringswf&klPath=ringtone.swf");
    }

    And similarly, this is for the disable button:

    disableButton.onPress = function()
    {
    	commandOutput.text = "Disabling ringtone..";
     
    	var loader:LoadVars = new LoadVars();
     
    	loader.onLoad = handleResponse;
     
    	loader.load("http://127.0.0.1:1001/Basic/ring?klCommand=disableringswf&klPath=ringtone.swf");
    }

    And here’s the handler, used by both commands calls, to print out the KuneriLite response error code:

    function handleResponse()
    {
    	commandOutput.text += " Error code: " + this.klError;
    }

    Step 3: building and testing

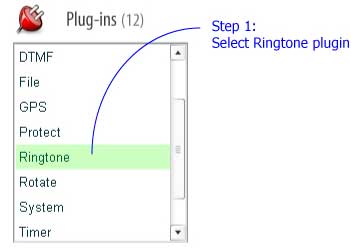
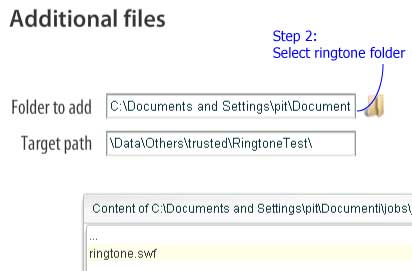
    Building a KuneriLite app is easy as always, but you need to follow these 4 specific steps to make the ringtone correctly work:

    1. Select Ringtone plugin
    2. Place your ringtone SWF in a separate folder, containing only that SWF, and then select it on Wizard Step 2
    3. Select the ringtone setter as main SWF
    4. Since Ringtone plugin needs signing, on Step 3 fill in the certificate infos

    Once done, just compile and transfer your SIS on your phone, install and launch it:

    • on main app screen, click the enable button
    • check the command output, to see if the command executed successfully: you should see this message
      Enabling ringtone... Error code: 0
    • if yes, just close the app and call your own phone, and your FlashLite ringtone will magically appear!
    • within the ringtone SWF you will see the caller’s name (if available on your phonebook), otherwise its phone number
    • to answer or reject the incoming call, simply use the buttons we previously placed on stage

    That’s it!

    Conclusions

    Now, add this with the other KuneriLite features, and you could end up having:

    • browsable ringtones catalogs, directly downloadable from your FlashLite app
    • ringones for specific contacts (a phonebook plugin would be great!)
    • location-based ringones!

    Isn’t this enough?
     
    • José Xavier 6:14 pm on October 8, 2008 Permalink

      Hi,
      Can i translate your tutorial to portuguese to post in my blog and ofcourse i’ll say that tutorial is yours… sorry my english.
      :)

    • Jukka 11:07 am on October 9, 2008 Permalink

      Hi Alessandro,
      awesome tutorial as usual :)

      One comment: Handling answer and reject buttons in Flash Lite is actually unnecessary, since KuneriLite ringtone plugin handles the ‘green’ and ‘red’ dialkeys.
      They are naturally used when answering a call ;)

    • pit 11:42 am on October 9, 2008 Permalink

      Hi all!

      @José: sure, feel free to translate it to portuguese!

      @Jukka: thanks for the reminder! I’ve added this info to the article :)

  • pit 9:33 am on October 6, 2008 Permalink | Reply
    Tags: , , , nokia, s60 5th edition, , touch scrolling, touch ui   

    Touch and J2ME part 1: how scroll an image 

    When you start writing your first app for the new S60 5th edition platform you’ll find that, among the first things to deal with, there is interface scrolling: when playing with touchscreen devices, users expect to be able to interact with on-screen objects by simple stylus/finger gestures, rather than by an old-fashion, on-screen keyboard.

    Today, we’ll see how to implement touch scrolling in Java ME in a simple scenario: scrolling a large Image, that doesn’t fit on the device display.

    A sample MIDlet showing this code in action is available on the emulator page: Touch scrollable image in action.

    Source Code: ScrollableImageCanvas class

    Let’s start defining the main class, that will extend the Canvas object:

    public class ScrollableImageCanvas extends Canvas
    {
    {

    Now, we define properties that we’ll use to manage:

    • image size
    • image translation
    • user touch interaction
    // image-related properties
    int imageHeight = 0;
    int imageWidth = 0;
    Image image = null;
    // scroll properties
    protected int translationX = 0;
    protected int translationY = 0;
     
    // touch properties
    protected int lastPointerX = -1;
    protected int lastPointerY = -1;

    Class constructor is quite straightforward, and only needs an Image as argument:

    public ScrollableImageCanvas(Image image)
    {
    	this.image = image;
    	this.imageWidth = image.getWidth();
    	this.imageHeight = image.getHeight();
    }

    Also paint() implementation is simple, since it simply draws the given Image at current translation x and y coordinates:

    protected void paint(Graphics g)
    {
    	g.setColor(0xffffff);
    	g.fillRect(0, 0, getWidth(), getHeight());
    	g.drawImage(image, - translationX, - translationY, Graphics.TOP | Graphics.LEFT);
    }

    Finally, we must implement the touch-based scrolling functionality. To do this, we’ll override the 3 pointer handlers provided by Canvas objects:

    • pointerPressed: called when the pointer is pressed
    • pointerReleased: called when the pointer is released
    • pointerDragged: called when the pointer is dragged
    protected void pointerPressed(int x, int y)
    {
    	lastPointerX = x;
    	lastPointerY = y;
    }
    protected void pointerReleased(int x, int y)
    {
    	lastPointerX = -1;
    	lastPointerY = -1;
    }
    protected void pointerDragged(int x, int y)
    {
    	scrollImage(lastPointerX - x, lastPointerY - y);
    	lastPointerX = x;
    	lastPointerY = y;
    }

    The scrollImage() method implementation follows. What it does is:

    • increment the current translation x and y coordinated by the given x and y deltas
    • normalize the new translation x and y coordinates, so that Image will not go out of bounds
    void scrollImage(int deltaX, int deltaY)
    {
    	if(imageWidth > getWidth())
    	{
    		translationX += deltaX;
    		if(translationX < 0)
    			translationX = 0;
    		else if(translationX + getWidth() > imageWidth)
    			translationX = imageWidth - getWidth();
    	}
     
    	if(imageHeight > getHeight())
    	{
    		translationY += deltaY;
     
    		if(translationY < 0)
    			translationY = 0;
    		else if(translationY + getHeight() > imageHeight)
    			translationY = imageHeight - getHeight();
    	}
     
    	repaint();
    }

    Complete class source code is available here: ScrollableImageCanvas.java.

    If you like this article, feel free to rate it on Forum Nokia Wiki.

    Further development

    A lot of improvements can be done to the code presented in this article. Just some examples are:

    • scrollbars: a fundamental element to let the user know how much he can scroll both in vertical and horizontal directions
    • smooth scrolling: using some inertia when applying scrolling movement will make the whole scrolling effect a lot more realistic
     
    • truf 11:44 am on October 7, 2008 Permalink

      Looking forward for part 2.

    • Bhaskar Nag 8:51 am on November 5, 2008 Permalink

      Your site is very strong in contents of j2me.I got my required codes in j2me from your site.please send me lots of j2me (mobile application code) in my mentioned emailid bellow,I would be highly obliged.
      bhaskar.nag@rediffmail.com
      Thanking You.
      Your’s truely.
      Bhaskar Nag.

    • kamil inal 1:54 pm on November 6, 2009 Permalink

      Thanks for this article:)

    • ankush 9:00 am on April 16, 2011 Permalink

      thanx a lot .. :D

    • abah 1:40 pm on September 16, 2011 Permalink

      thanks! it helps me! :D

c
compose new post
j
next post/next comment
k
previous post/previous comment
r
reply
e
edit
o
show/hide comments
t
go to top
l
go to login
h
show/hide help
shift + esc
cancel