How to use Nokia API Bridge in Flash Lite with FDT
API Bridge is a Symbian engine that exposes a set of native functionalities to Web Runtime, Flash Lite and Java ME applications. Nokia has recently released an ActionScript library that allows to easily integrate APIBridge functionalities in a Flash Lite application.
In this article I’ll try to explain how to setup and develop a Flash Lite application that uses APIBridge, by using FDT.
If you want to know how to configure FDT (and Eclipse) to properly develop Flash Lite application, you should read this article: Web Runtime and Flash Lite integrated development on Eclipse.
Setup the project in FDT
First of all, you need to download the API Bridge FlashLite library from Forum Nokia: API Bridge Flash Lite Library and Sample Code. The package also contains useful sample code that will definitely help.
Now, create a new Flash Lite project within Eclipse.
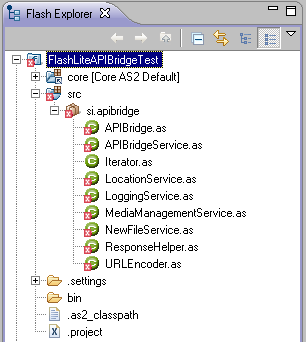
Then, open up the API Bridge package downloaded from Forum Nokia, and copy the “si/” folder to the “src/” folder of your Flash Lite project.
Once copied, you should notice some errors in your FDT project, as shown in the picture below.
These errors are due to the “mx.*” package, that is not included in the ActionScript classes shipped with FDT. To solve this error, you have to tell FDT where to find these classes.
First, let’s copy these classes from the Flash IDE to a dedicated folder:
- Create a folder called “mx_package/” somewhere on your machine
- Go into “<FLASH_IDE_PATH>\en\First Run\Classes\” folder
- Copy the “mx/” folder inside the “mx_package/” folder created above
Now, configure FDT:
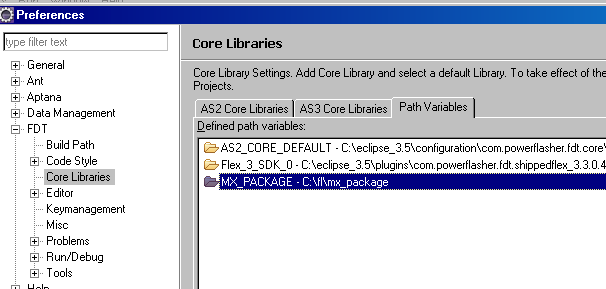
- Go into “Window” -> “Preferences” -> “FDT” -> “Core Libraries”, open the “Path variables” panel and select “New…”
- Enter “MX_PACKAGE” as name, and select the “mx_package/” created above as folder
- Once done, your Core Libraries should look similar to the picture below
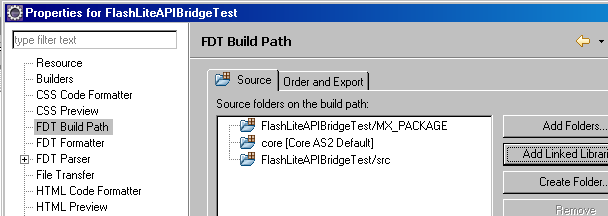
Now, what remains to do is to add the MX library to the Flash Lite project. Go into the project’s properties and, in the “FDT Build Path” section, select “Add Linked Library…” -> “Add…” and pick “MX_PACKAGE”.
Done this, all the errors should have gone away from the project. Hurrah! ![]()
Patching the mx.utils.Delegate class
The MTASC compiler is stricter than the compiler you can find within the Flash IDE. For this reason, the mx.utils.Delegate class needs to be slightly modified in order to make it properly compile with MTASC.
Specifically, the ‘create()’ function needs to be adjusted as follows:
static function create(obj:Object, func:Function):Function { var f = function() { var target = arguments.callee.target; var func2 = arguments.callee.func; return func2.apply(target, arguments); }; f.target = obj; f.func = func; return f; } |
Patching the si.apibridge.APIBridge class
For the same reasons explained above, also the si.apibridge.APIBridge class needs to be patched to work with MTASC. To do this, open APIBridge.as and replace the setPort() function with this one:
private function setPort(): Void { var portVars:LoadVars = new LoadVars(); portVars.load( portPath ); var pushErrorDelegate : Function = Delegate.create(this, pushError); portVars.onLoad = function( success ) { if (success) { var portData:String = portVars.toString(); portData = portData.substr(0,portData.indexOf("=")); trace(portData); APIBridge.BridgeURL += portData; } else { trace("Error loading Port");// The data didn't load pushErrorDelegate("1","Error loading port, using default 9080"); APIBridge.BridgeURL += "9080"; } } } |
Once done, just create a new MTASC launch configuration and check that the project properly compiles. If it doesn’t, re-check the steps above.
Using API Bridge Call Log service in Flash Lite
Now, we’ll see how to use an API Bridge service, the Call Log one, in Flash Lite.
First, let’s create the main project’s class. In this example I’ll call it ‘MainMovie’.
import com.jappit.flashlite.apibridgetest.Logger; import com.jappit.flashlite.apibridgetest.CallLogRetriever; class com.jappit.flashlite.apibridgetest.MainMovie { public static function main(container : MovieClip) : Void { Stage.align = "TL"; Stage.scaleMode = "noScale"; container.createTextField("tf", 1, 0, 0, 360, 500); var textField : TextField = container["tf"]; } } |
The TextField instance will be used to show the events retrieved from the device logs. Now, let’s create a separate class, EventsLogRetriever, that will take care of calling APIBridge, and of managing its responses. Its constructor is defined to accept a TextField as argument, and it will use it to print out the API Bridge response.
import mx.utils.Delegate; import si.apibridge.*; class com.jappit.flashlite.apibridgetest.EventsLogRetriever { private var textField : TextField; public function EventsLogRetriever(_textField : TextField) { this.textField = _textField; } |
Now, it’s time to define the method that will call the API Bridge engine. Each call to an API Bridge interface must typically define two handlers: a success and a failure handler. The error handler receives a single argument, containing the data of the occurred error. About the success handler, it receives three arguments:
- the transaction ID, that must be used to uniquely identify the transaction that is calling the handler (useful in scenarios where multiple transactions are active concurrently)
- the event ID, that identify the state of the event
- an object containing data returned by the API Bridge call
Said that, the EventsLogRetriever class will end up containing these 3 methods:
public function retrieveEvents() : Void { } public function onApiError(outParam : Object) : Void { } public function onApiSuccess(transactionID:Number, eventID:String, outParam:Object) { } |
Starting with the retrieveEvents() method, it has to:
- instantiate APIBridge, passing a reference to the error handler as argument
- grab a reference to the Logging service
- define which kind of log events it wants to retrieve
- call the GetList() service method
So, the retrieveEvents() can be implemented as follows:
public function retrieveEvents() : Void { var _onApiError : Function = Delegate.create(this, onApiError); var _onApiSuccess : Function = Delegate.create(this, onApiSuccess); var bridge:APIBridge = new APIBridge(_onApiError); var logging = bridge.Service("Service.Logging", "IDataSource"); textField.text = "Retrieving phone numbers ..." + APIBridge.BridgeURL; var filter = {EventType:0}; var inParams = {Type:"Log", Filter:filter}; logging.GetList(inParams, _onApiSuccess); } |
Coming to the error handler, let’s just implement it to make it show the returned error data:
public function onApiError(outParam : Object) : Void { textField.text = "APIBridge error " + outParam.ErrorCode + " " + outParam.ErrorMessage; } |
Now, the success handler. First, it has to check if the returned API Bridge data contains an error, and this can be done with the same logic used in the error handler above. If no errors are detected, the handler can retrieve the actual returned data, contained in outParam.ReturnValue, and loop all the returned log events.
public function onApiSuccess(transactionID : Number, eventID : String, outParam : Object) { textField.text = "Results: " + outParam.ReturnValue.length + "\n" ; if (outParam.ErrorCode != 0) { textField.text = "Error: " + outParam.ErrorCode + ", " + outParam.ErrorMessage; return; } else { var outList = outParam.ReturnValue; var outputEntry = null; do { outputEntry = outList.next(); if (null != outputEntry) { textField.text += outputEntry.Direction + ": " + outputEntry.Description + ", " + outputEntry.PhoneNumber; textField.text += "\n"; } else { break; } } while (true); } } |
Done this, the EventsLogRetriever is ready to be used, and to do this it’ll be enough to add this two lines to the static() method of the MainMovie class:
var retriever : EventsLogRetriever = new EventsLogRetriever(textField); retriever.retrieveEvents(); |
That’s all!
Build and deploy
Once the Flash Lite app is ready, just build it using the MTASC launch configuration created before.
Now the tough part: to make the whole thing work, it is necessary to package the Flash Lite application with the API Bridge engine. To do this, there are various options:
- Build a Flash Lite launcher in Symbian C++. These Forum Nokia Wiki articles explain how this can be done:
- Package the Flash Lite application in a WRT widget, and then package it with the API Bridge engine. This approach is described in these articles:
- How to use FDT and Aptana to create a Flash Lite enabled WRT widget: explains how to package Flash Lite in a WRT widget
- Build your first Web Runtime widget with APIBridge: explains how to package a WRT widget with the API Bridge engine
Both the approaches can equally work, so feel free to choose the one you prefer ![]()
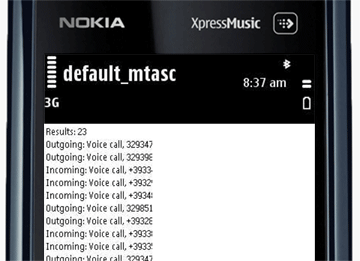
Once deployed on a device, just run it, and you should see this:
1) The Flash Lite app starts, and the API Engine is initialized
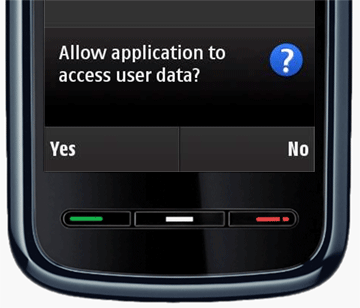
2) The API Bridge engine asks the user for permission to access sensitive data
3) And here are the retrieved log events!






Reply