J2ME Images: how to create a reflection effect
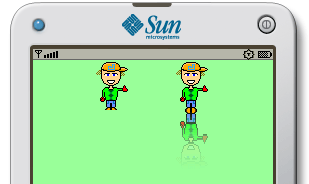
It’s surely time for some new J2ME tutorial, so this article will explain how to create a nice reflection effect starting from a simple Image.

You can see the final effect, as usual, on the emulator page: J2ME Image reflection in action.
Source code
1. Method declaration
Let’s start by our method declaration:
public static Image createReflectedImage(Image image, int bgColor, int reflectionHeight) { } |
We have 3 arguments:
- the original image that we want to reflect
- the background color (used for transparent images)
- the height of the reflection effect
2. The mutable Image
Now, let’s create the mutable Image that will hold the resulting effect:
int w = image.getWidth(); int h = image.getHeight(); Image reflectedImage = Image.createImage(w, h + reflectionHeight); |
We store the original image width and height into 2 int variables, and then create the mutable image with the same width, but with an height equal to h (the original image) plus the specified reflection height.
3. Copy the original Image
Now, first drawing steps are:
- Getting the Graphics object of our mutable image
- Filling the image with the background color
- Drawing the original image on the upper part of the mutable one
Graphics g = reflectedImage.getGraphics(); g.setColor(bgColor); g.fillRect(0, 0, w, h + reflectionHeight); g.drawImage(image, 0, 0, Graphics.TOP | Graphics.LEFT); |
4. Create the reflection effect
Now, let’s get to the important part of this tutorial, that is the reflection effect itself:
- for each horizontal line of the reflected image part, take the corresponding vertical coordinate of the original image
- get the RGBA data of the corresponding horizontal line of the original image
- calculate the alpha to be applied to this line, and apply it to each element of the RGB data array
- draw the RGB data into the reflected image, by using its Graphics object
And here is the source code:
int[] rgba = new int[w]; int currentY = -1; for(int i = 0; i < reflectionHeight; i++) { int y = (h - 1) - (i * h / reflectionHeight); if(y != currentY) image.getRGB(rgba, 0, w, 0, y, w, 1); int alpha = 0xff - (i * 0xff / reflectionHeight); for(int j = 0; j < w; j++) { int origAlpha = (rgba[j] >> 24); int newAlpha = (alpha & origAlpha) * alpha / 0xff; rgba[j] = (rgba[j] & 0x00ffffff); rgba[j] = (rgba[j] | (newAlpha << 24)); } g.drawRGB(rgba, 0, w, 0, h + i, w, 1, true); } |
as you can see, the rgba[] int array holds the current pixel row data, and will be refreshed only when necessary (so, when the y coordinate of the original image changes).
Sample usage
Using the above method is really simple, since it’s only necessary to:
- Create the original Image
- Call createReflectedImage() method by passing the original Image as argument, together with the background color and the reflection effect height
Image originalImage = Image.createImage("/cap_man1.png"); Image reflectedImage = ReflectedImage.create(originalImage, bgColor, 64); |
Downloads
You can download the complete source code of this article here:
Vote this article!
If you liked this tutorial, feel free to vote it on Forum Nokia Wiki: How to create an image reflection effect in Java ME


ion 9:51 am on February 5, 2009 Permalink
hi.. nice code
could you help me how to draw a “Justified” Paragraf in canvas…. please !!